Fabulous new crochet pattern shop on Etsy

Crochet is my meditation – I just love the way that something grows before your eyes, and my favourite part is giving away my creation to a friend or loved-one when it’s finished.

I tried knitting once but decided that it wasn’t for me – crochet is hands-down my craft of prefence. I’ve made countless blankets and amigurumi but I’ve recently discovered intarsia crochet (aka tapestry crochet) which enables you to crochet motifs and make wall hangings, bunting and coasters, making use of colour combinationso to form a picture – something you just can’t do within the limits of standard crochet.

The technique takes a little getting used to but once you’ve got used to it, you’ll be proud of all the amazing creative possibilities that it opens up!

I’d like to introduce you to my friend’s new crochet pattern shop on Etsy, at the moment, she has a small, yet perfectly-formed collection of easy patterns.

Yarn and Shine is the name of the shop, so please check it out!

There’s a selection of baby blankets, coasters, bunting and wallhangings. She assures me thatshe has lots of new ideas so keep an eye out for the new designs.

Plus, she’s told me to give a plug to her Pinterest page, please follow it if you get a chance 🙂

All patterns come with US and UK instructions and there are even instructions for left and right handers if you need them.

Just a little plug, thank you for reading 🙂

Decorate your own bunting kit

There’s nothing more pleasant than getting a few friends together be it for a birthday, a hen party, or just a general gathering. It’s even more pleasant to sit around a table with cake, a pot of tea and potter creatively.

In this world of electronic devices, we’re quick to find distraction in the latest app, browning the web or social media on a smart phone. It’s less often that you give craft a chance; occupying your time by using your hands to make stuff.

In this ‘decorate your own’ bunting kit, you get about 20 white, 100% cotton flags. You can decorate them with ribbons, buttons and vintage-style fabrics. If you’re nifty with a needle, you can tack the embellishments straight onto the flag. For those not so keen on sewing you have the option of using Bondaweb, magic iron-on webbing that sticks one surface to another.

I’ve already put my bunting up in the living room and a friend has already requested that we use the kit as an activity at her hen party!


There are a few suggestions as to how to decorate the bunting flags but this is by no means exhaustive. This is your chance to be creative and come up with some fabulous designs to make some unique, personalised bunting. It’s the ideal decoration for a wedding, christening, birthday or baby shower! Let’s all channel our creativeness together!

Decorate your own bunting kit on Picker’s Kits

How to make use of time when you don’t have any!

This is a problem I’ve often encountered recently, holding down a full-time job and a long commute, whilst trying to find the time to start up Picker’s Kits.

My predicament is that there are always necessary things that take up my time including the hour drive to and from work, trying to go for a daily run, food shopping, cooking etc. By doing these necessary things, it often means that I’m not in the right headspace to do anything productive! I’m not quite there yet but these are the mechanisms I’ve started to put in place to make sure I’m productive when I want to be.

1. Stop watching TV

I stopped this about 18 months ago when I moved in with my boyfriend, he’d never been a fan of TV so I decided to give it a try and haven’t really missed it! We’re not completely deprived of audio-visual stimulation, with a subscription to Netflix we can watch films and I’ve been known to watch Outlander and Breaking Bad but this is when I choose to make time for it, there’s no aimlessly watching whatever’s on. By not using the default of switching the TV on after a hard day at work, it’s given me more time to focus on other things.

2. Power half hour

If you’re tight for time, set a period (of any length) and tell yourself what you need to achieve within that time. It keeps you completely focused because you have a time limit, you’re not easily distracted and you can try and get as much done as you can within that short amount of time.

3. Take shortcuts

If you can’t cook a full meal one evening, so what? Stick a pizza in the oven or cook double the night before so you can heat it up again the next evening.

4. Write lists

I’ve spent my whole life writing lists – if I lost the lists I keep at work, I’d have trouble being able to do my job! You can even take the list concet further by making a kanban board. It sounds fancy but it’s just a wall full of Post It notes, so you have a visual concept about what you have to do. Most importantly, you stick the Post It in the ‘Done’ column when it’s done, that way you can see the results of your productivity!

5. Put your happiness first

You can have as many methods as you like to save your time but if you’re stressed, just remember to breathe! Spend time with family and friends over doing stuff. Let’s face it, there’s a lot which isn’t urgent, just nice to do. Stop in your tracks and think ‘What’s important now?’ and take a shortcut if you need to. Make time for doing things that you enjoy!

If you’d like to be creative but are tight for time, check out the range of craft kits on Picker’s Kits – you can be crafty without having to find all of the materials, look for inspiration or take up your whole day!

Paper fairy light DIY lanterns

  
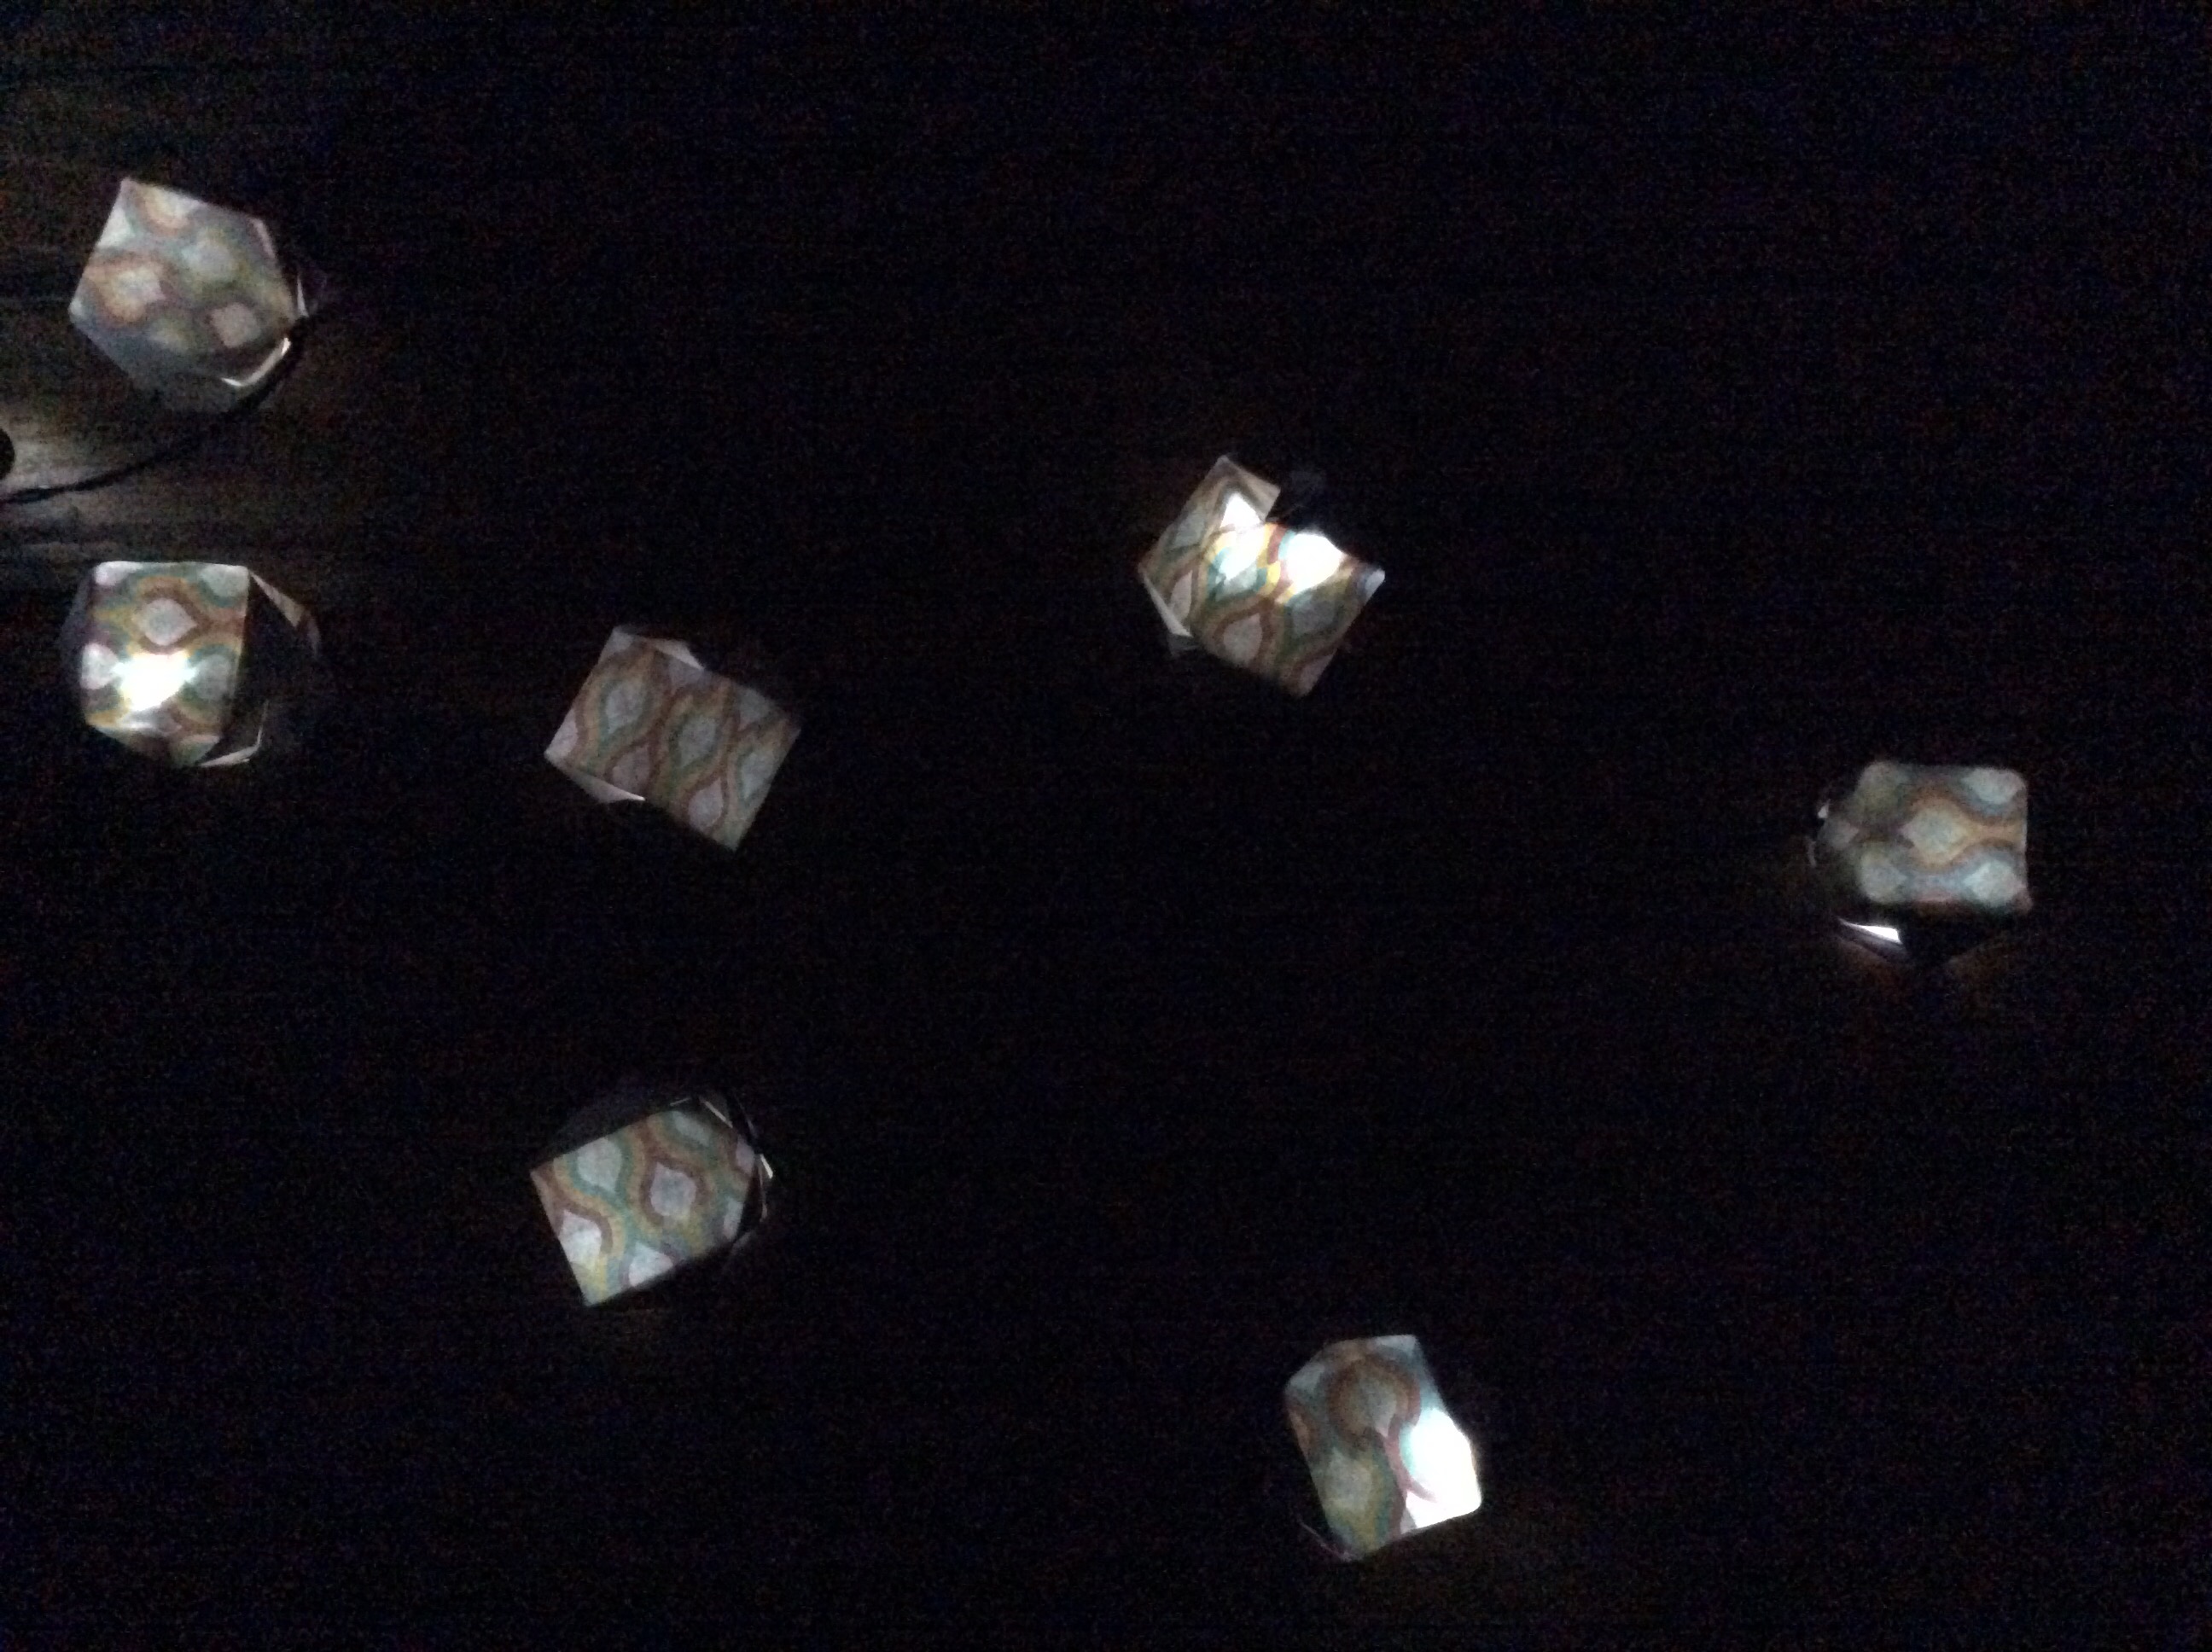
There’s something magical about fairy lights, they have the effect of making anywhere feel cosy! If you’d like to add a personal touch to your fairy lights, follow this simple guide. With Christmas coming up, these will be a festive addition to your decorations, and it only takes 30 minutes to make. With the pattern side on the inside, only when the light is on it the pattern revealed!

You will need:

– funky paper (about 90 gsm or less) with some white in the pattern
– fairy lights
– ruler
– scissors

How to make paper lantern fairy lights:

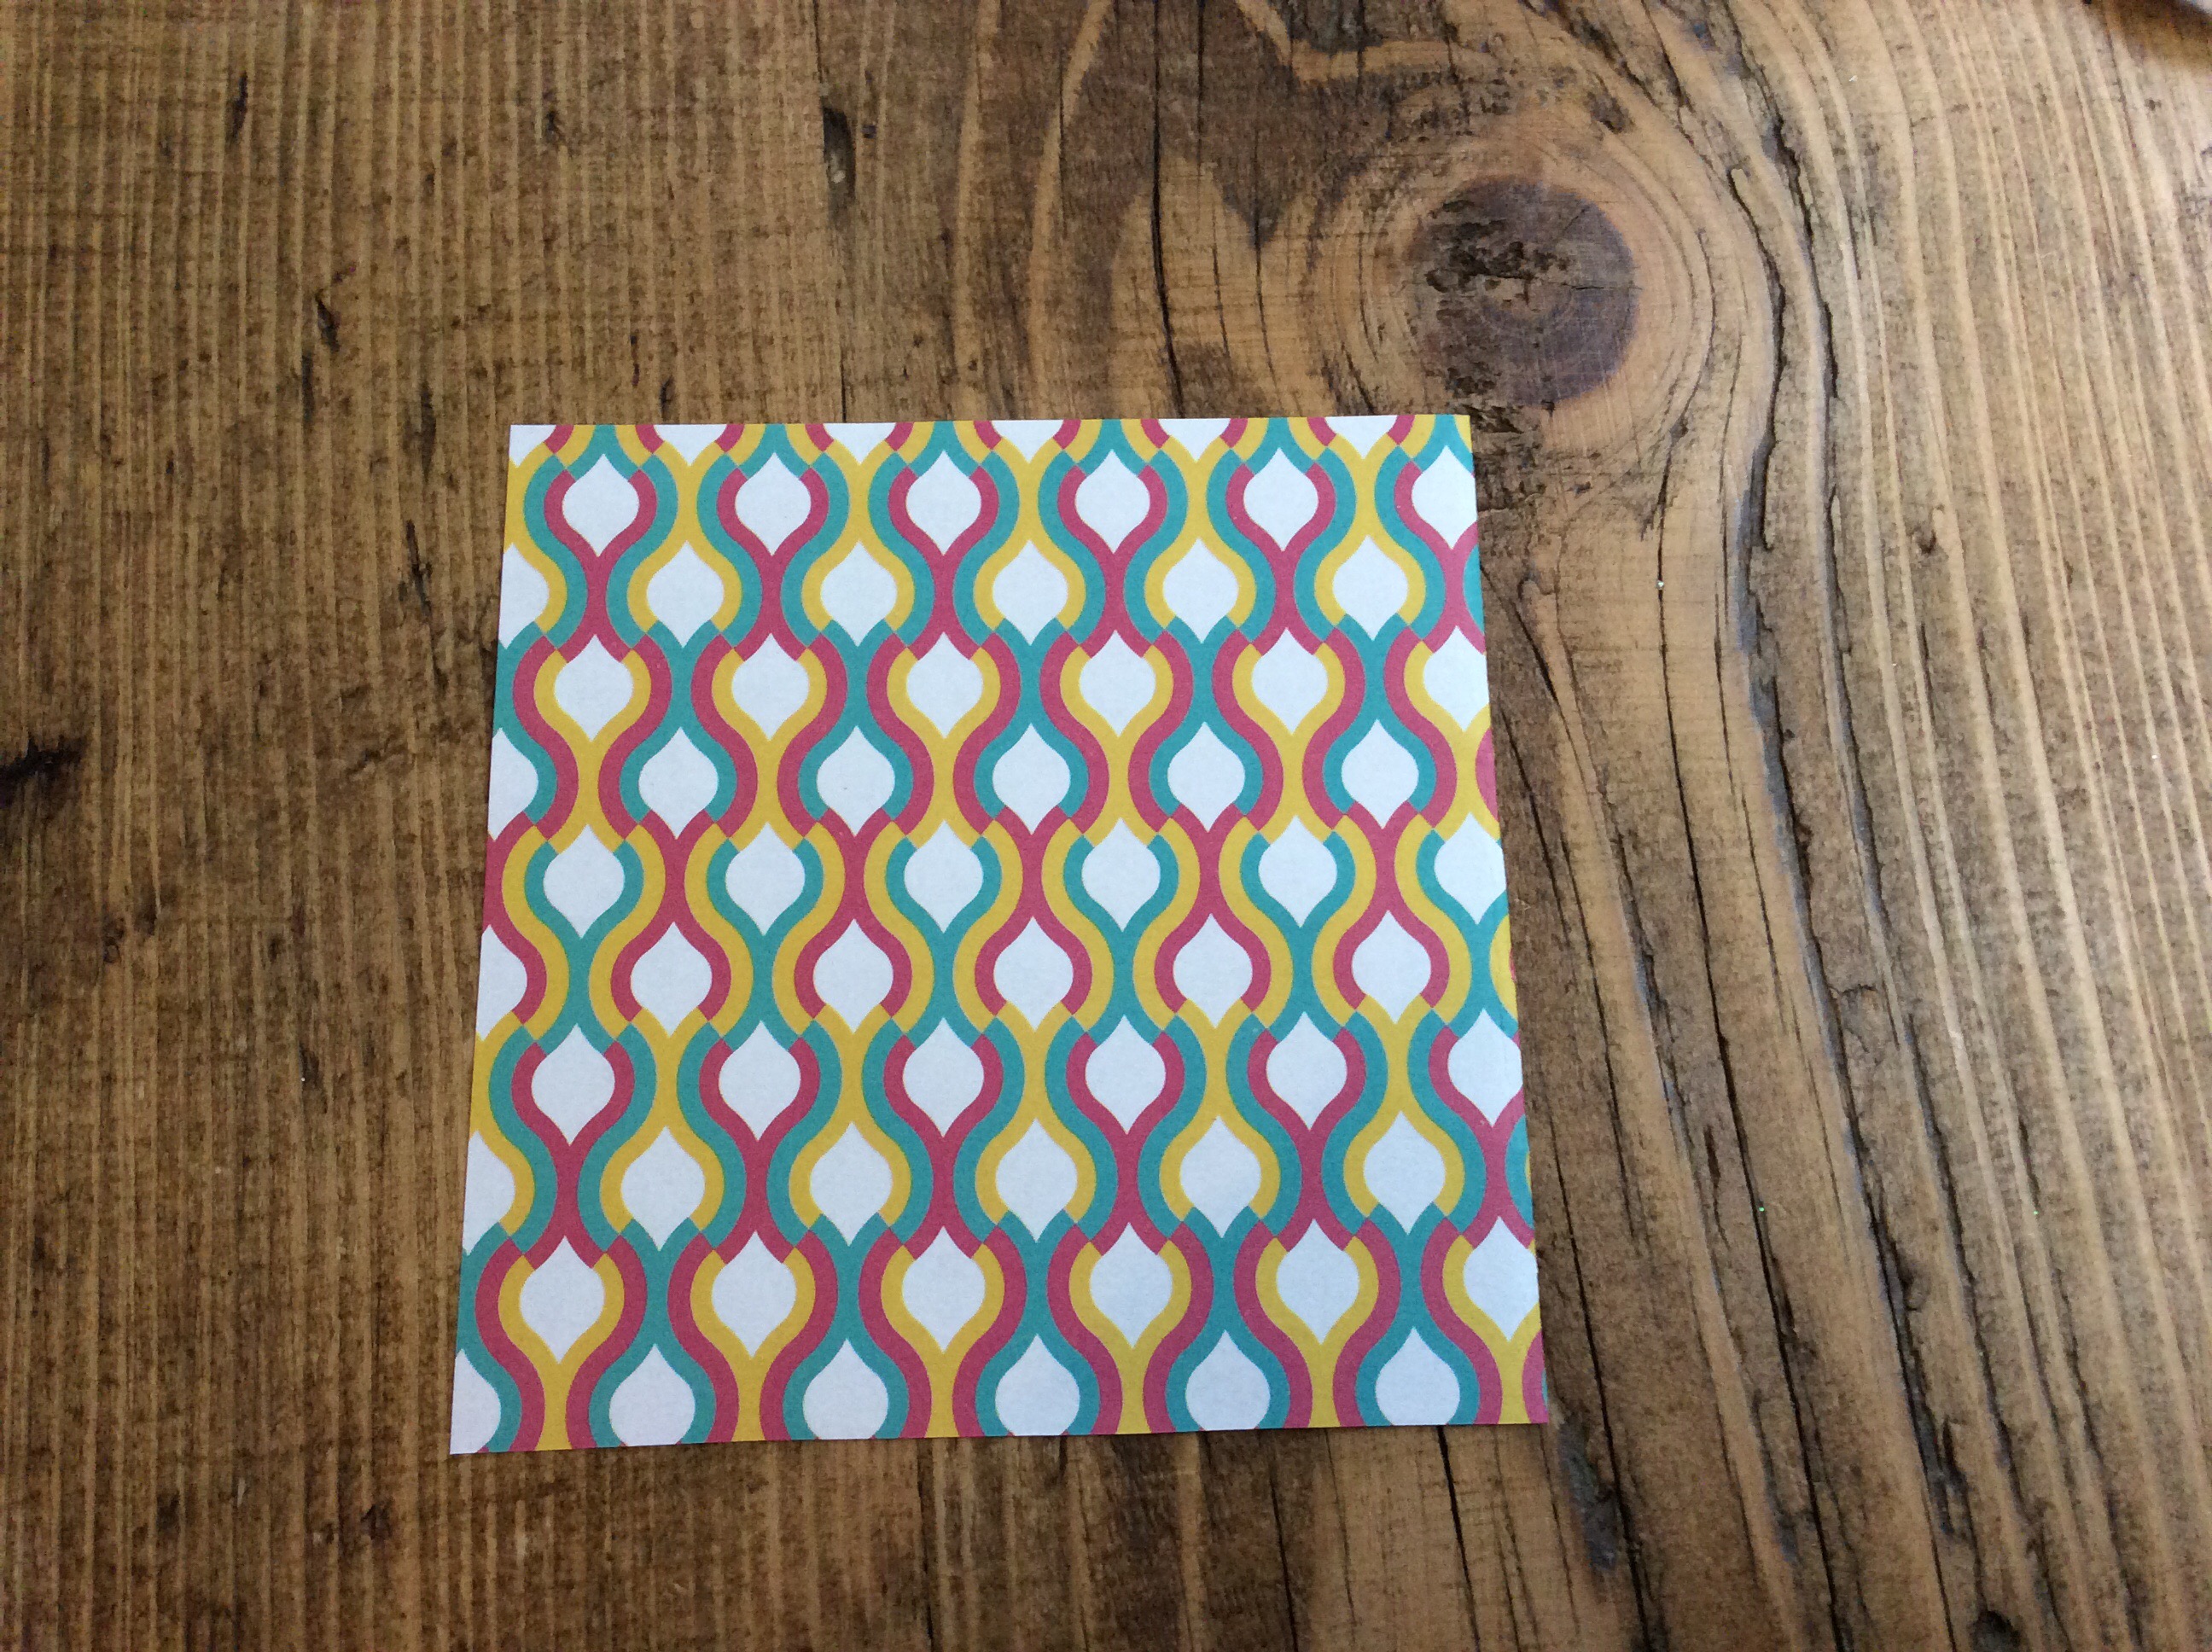
1. Cut your paper into squares, the one shown is 10.5 cm squared which will make quite small lanterns. If you’re looking for bigger lanterns, it might be best to experiment with different sizes and scrap paper.

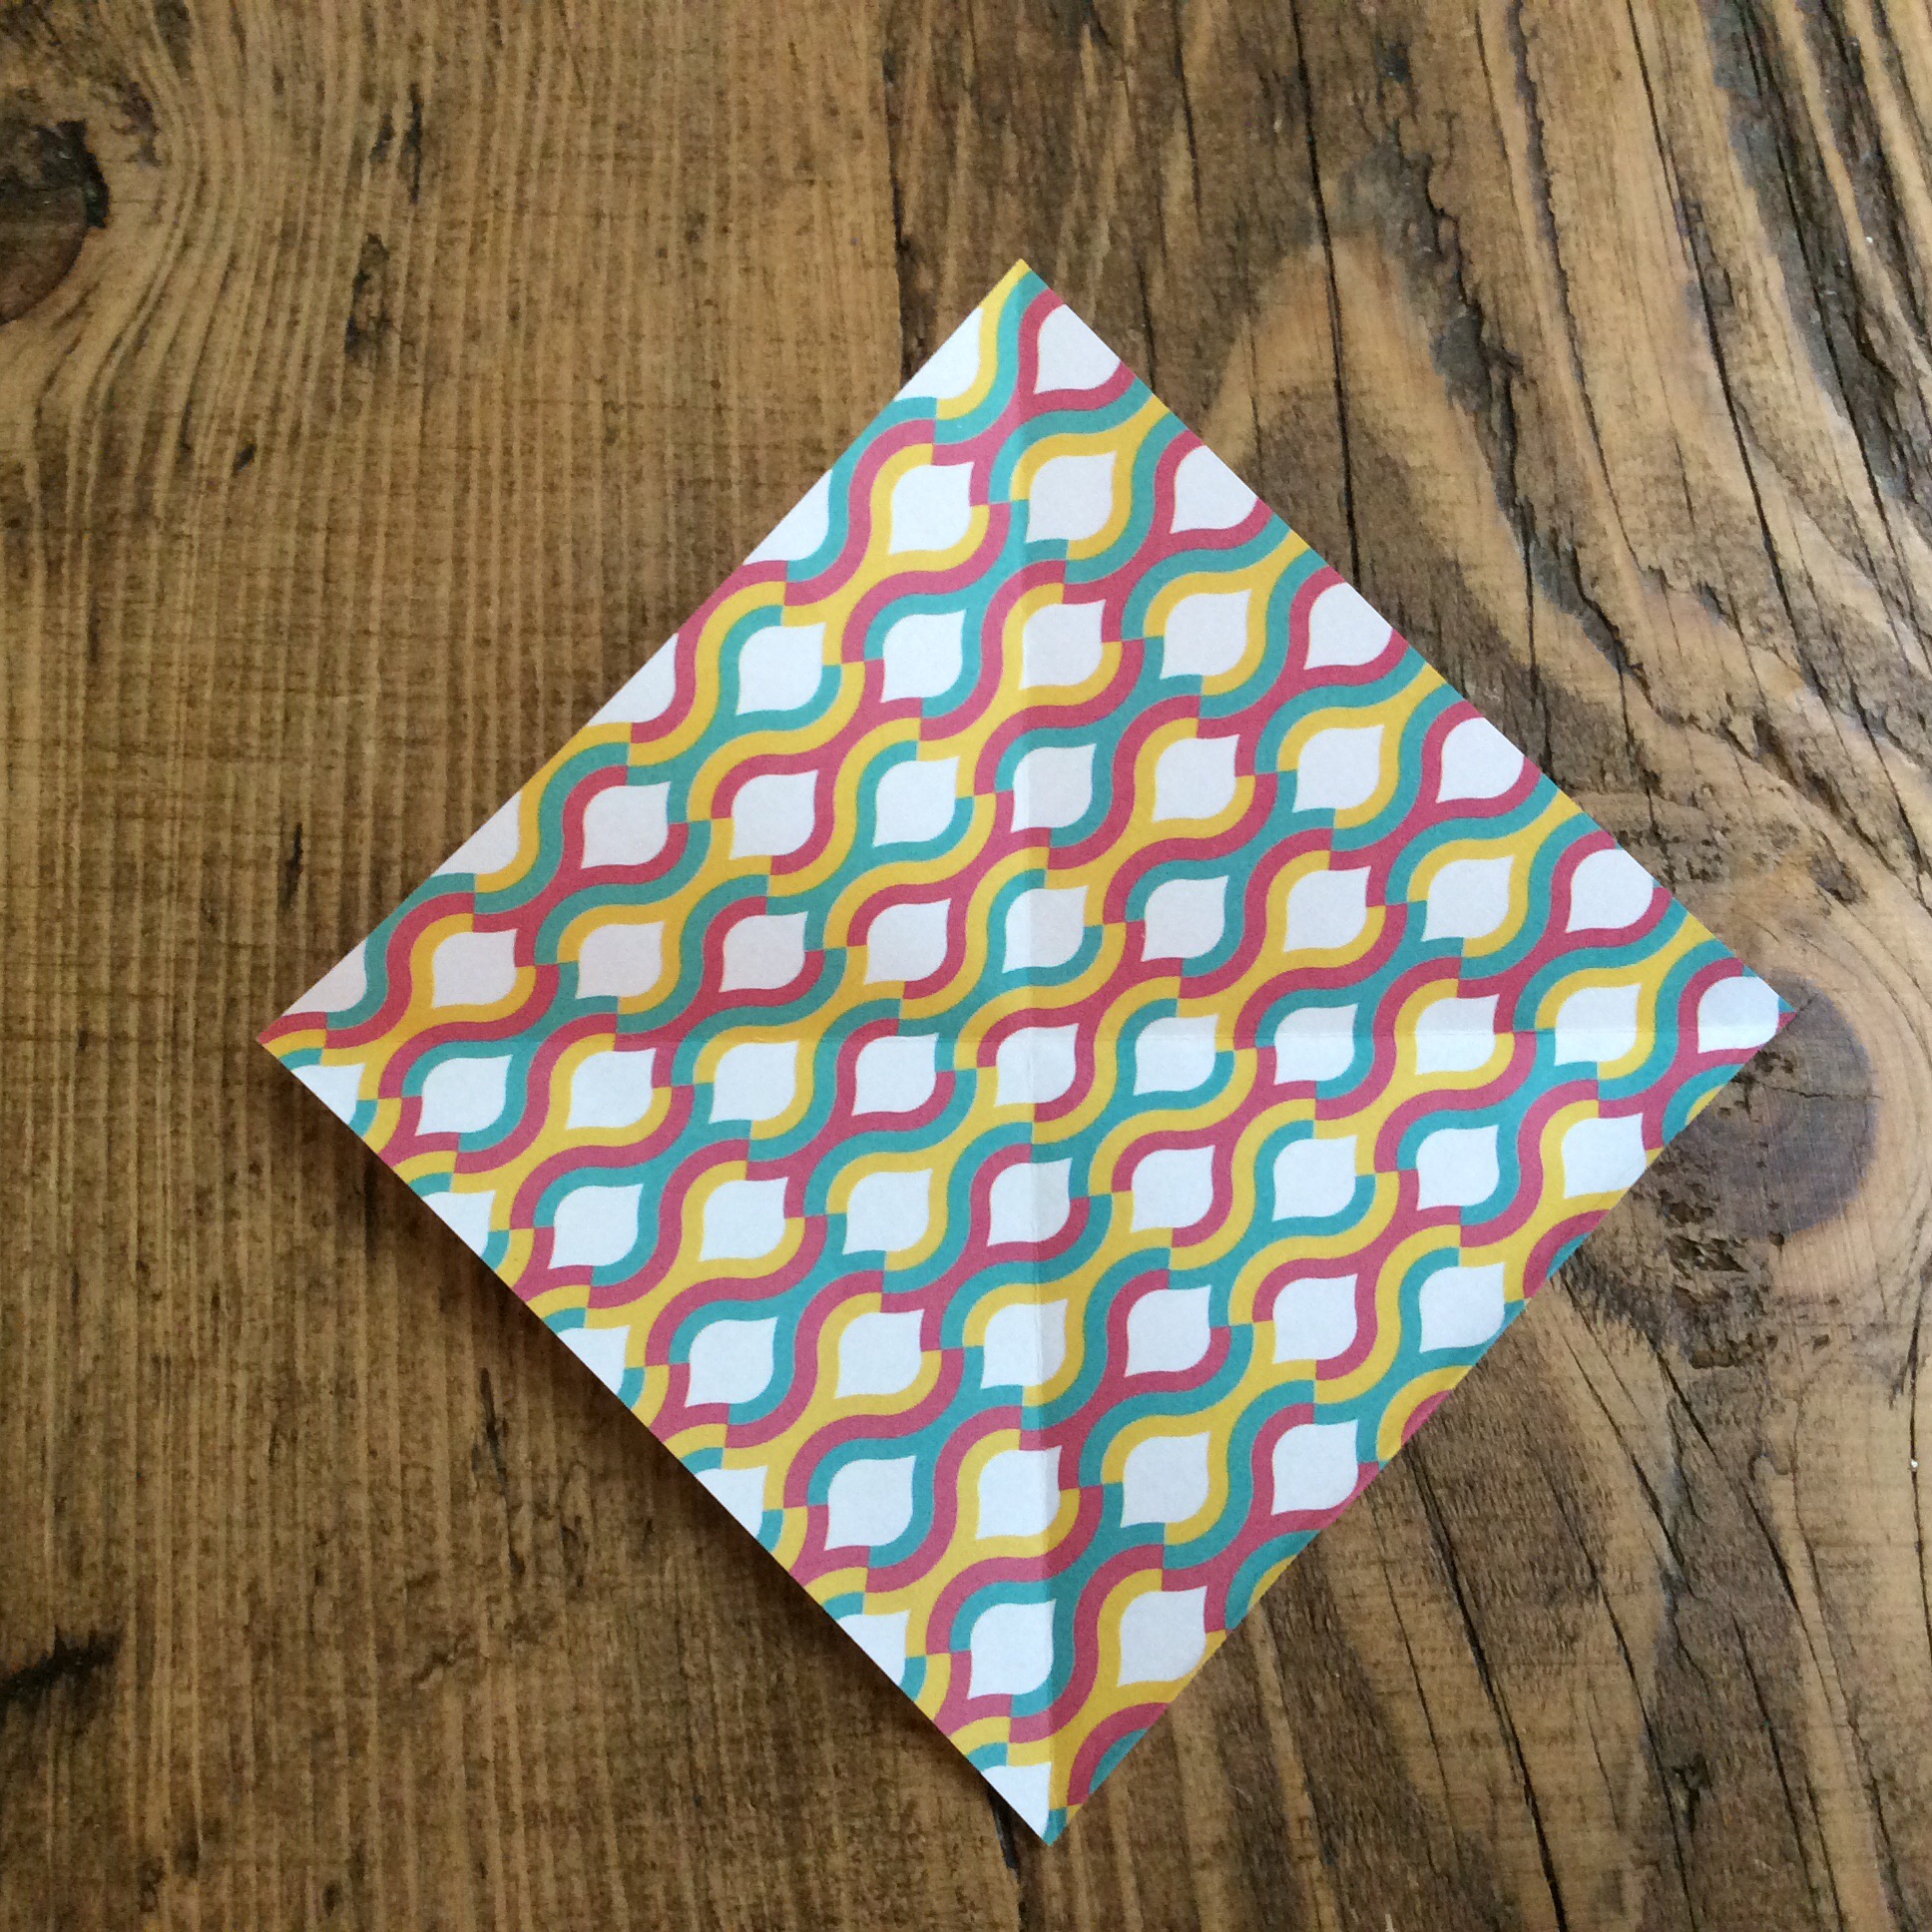
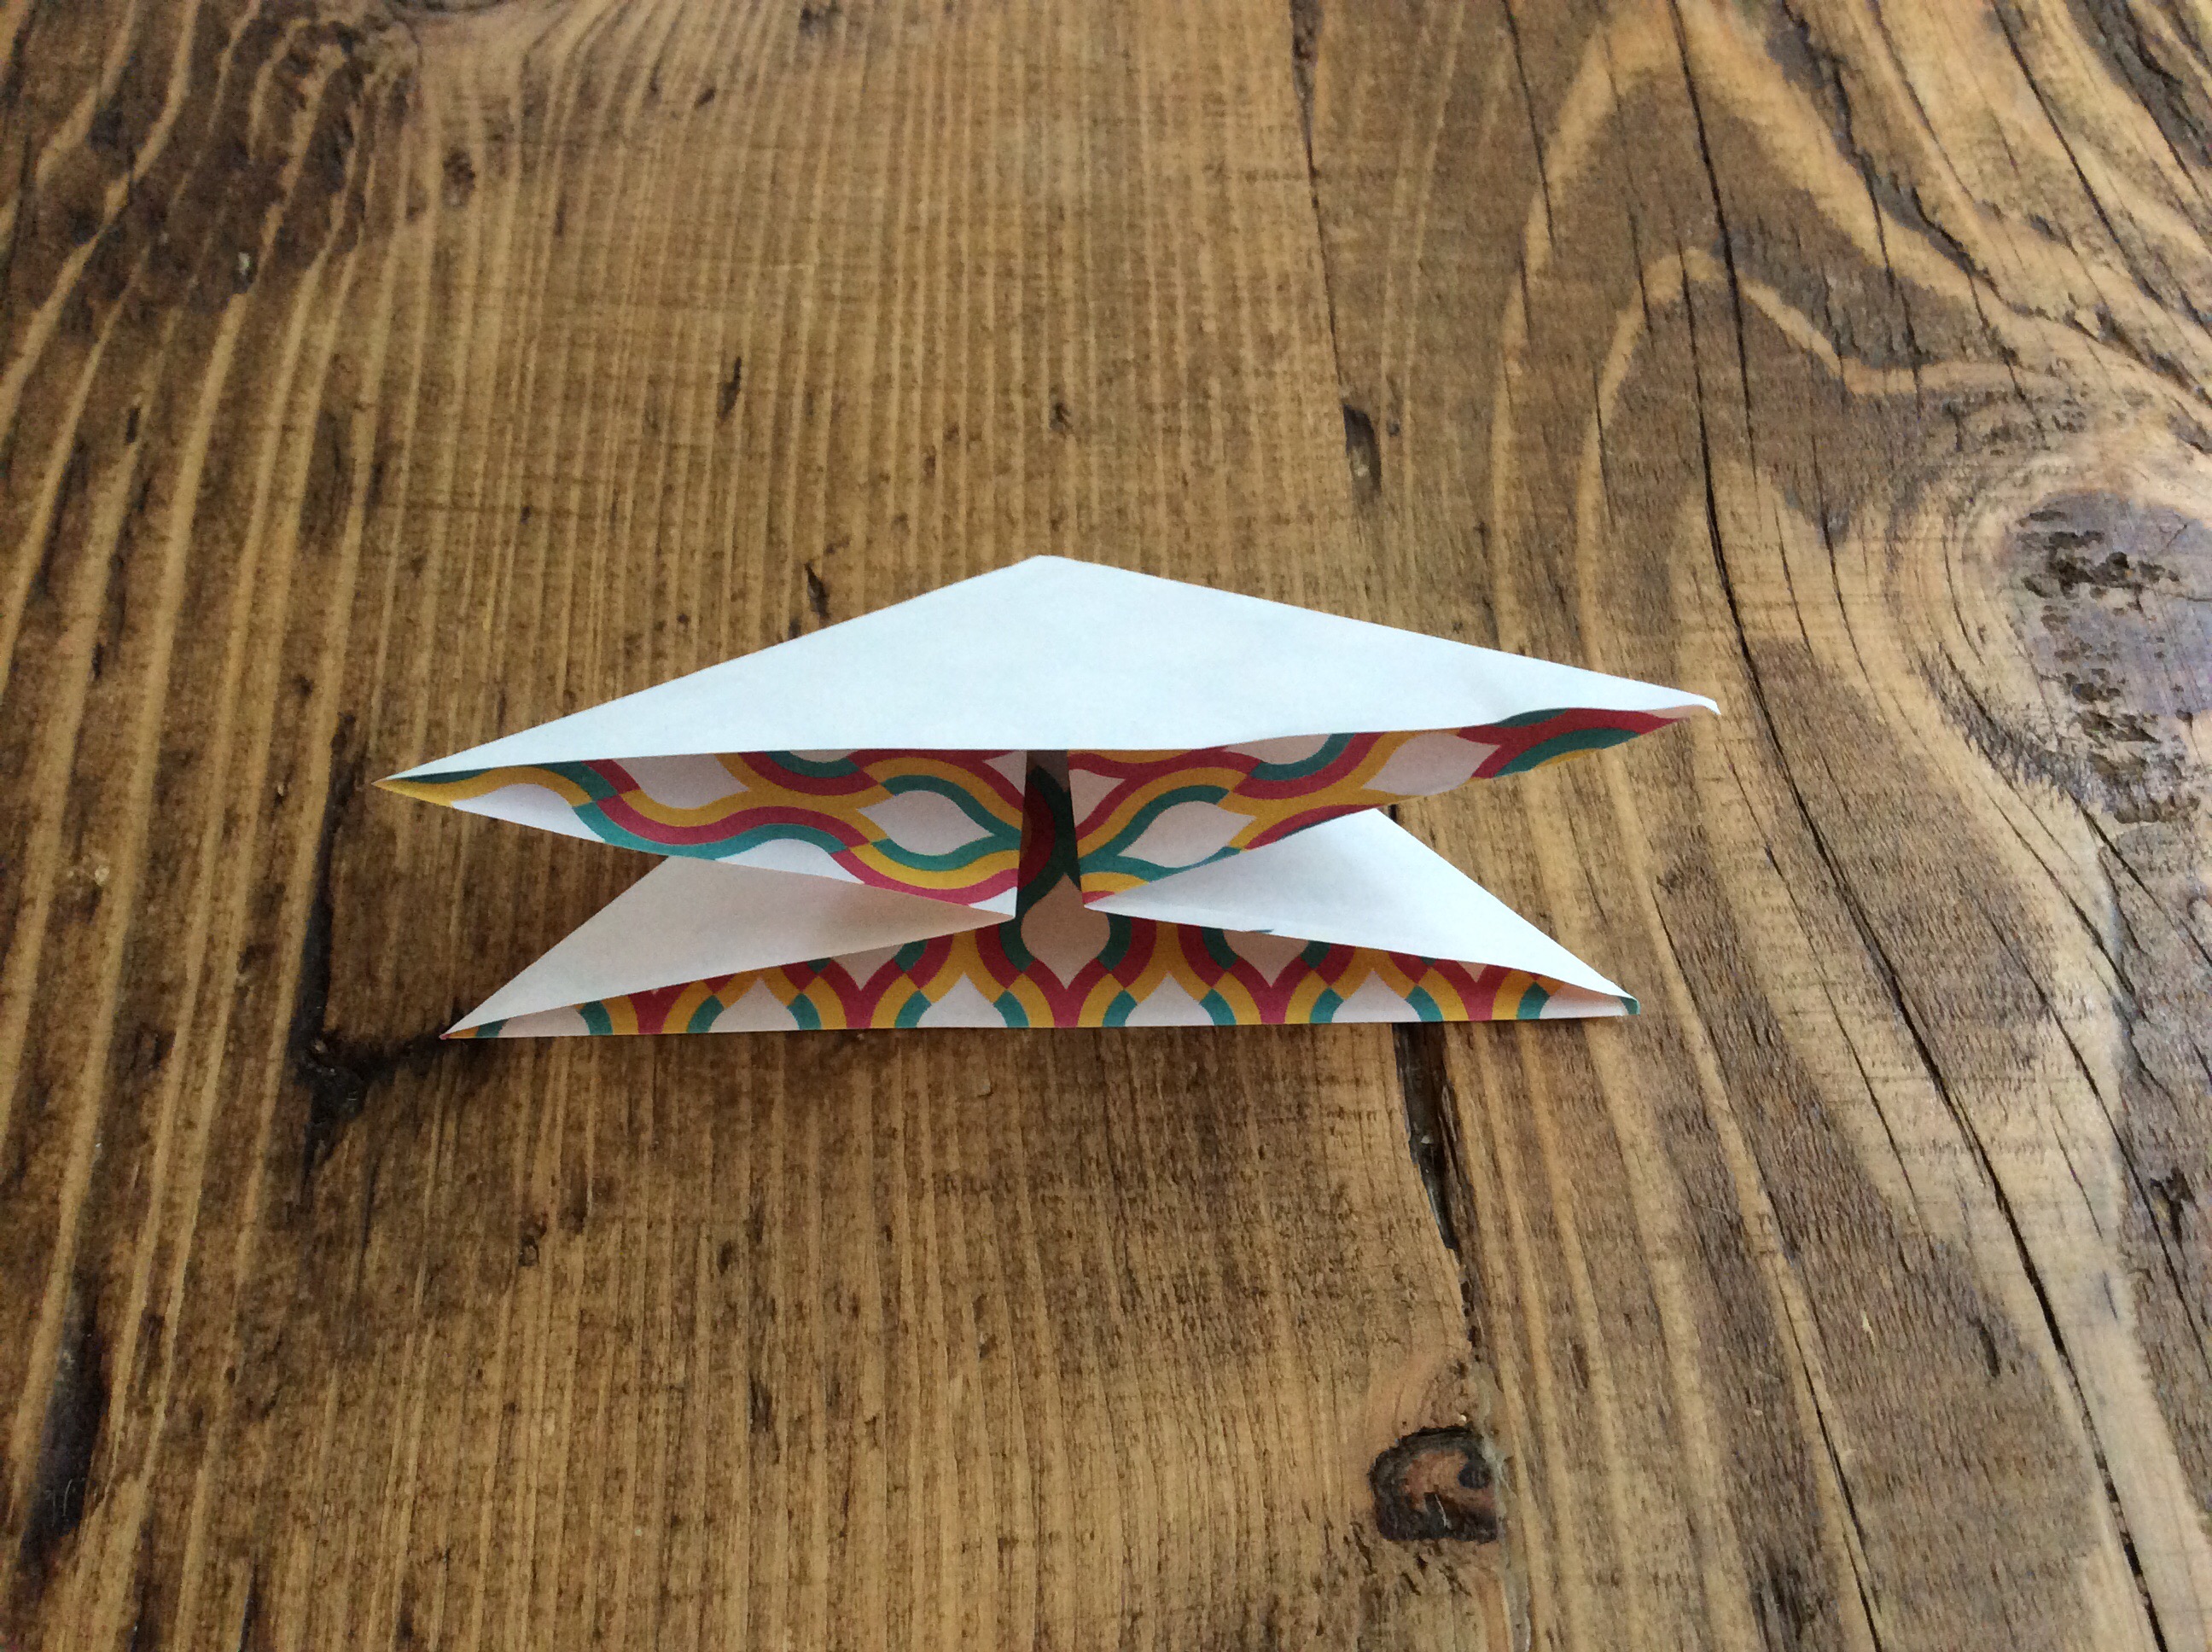
2. Fold the square diagonally from corner to corner.

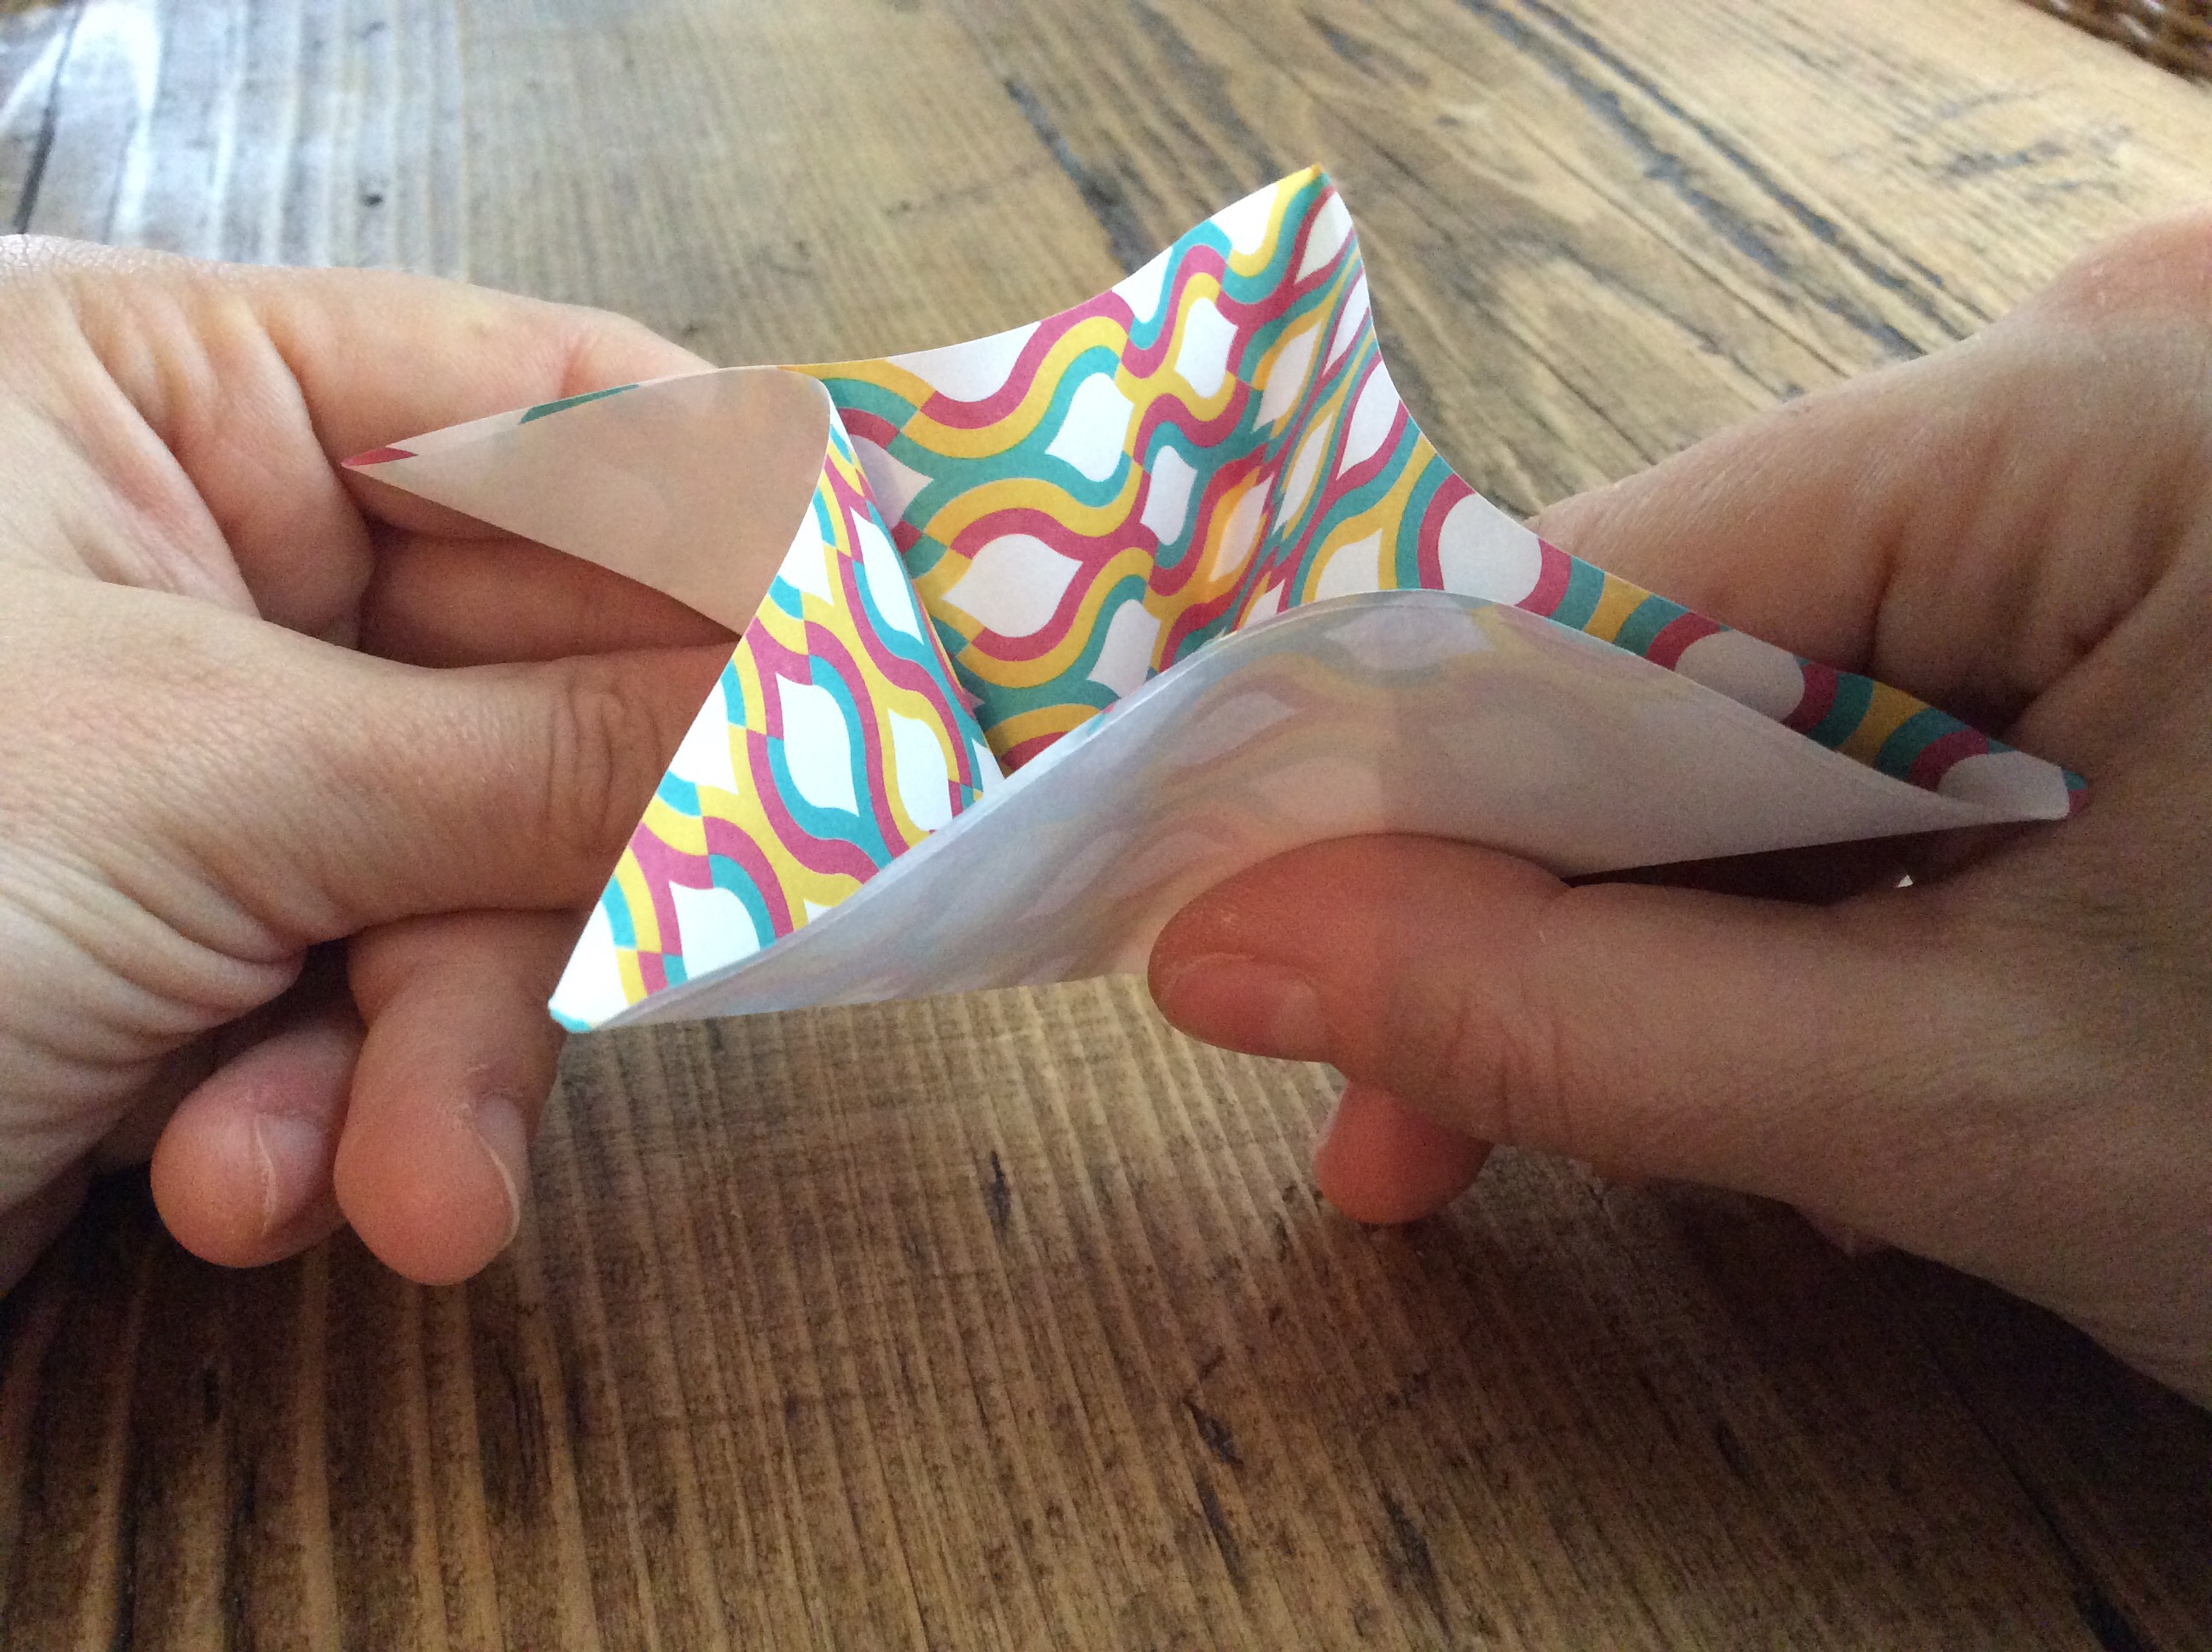
3. Pinch the fold between your finger and thumb at opposite sides and push it in. 

4. Flatten the paper into a triangle.

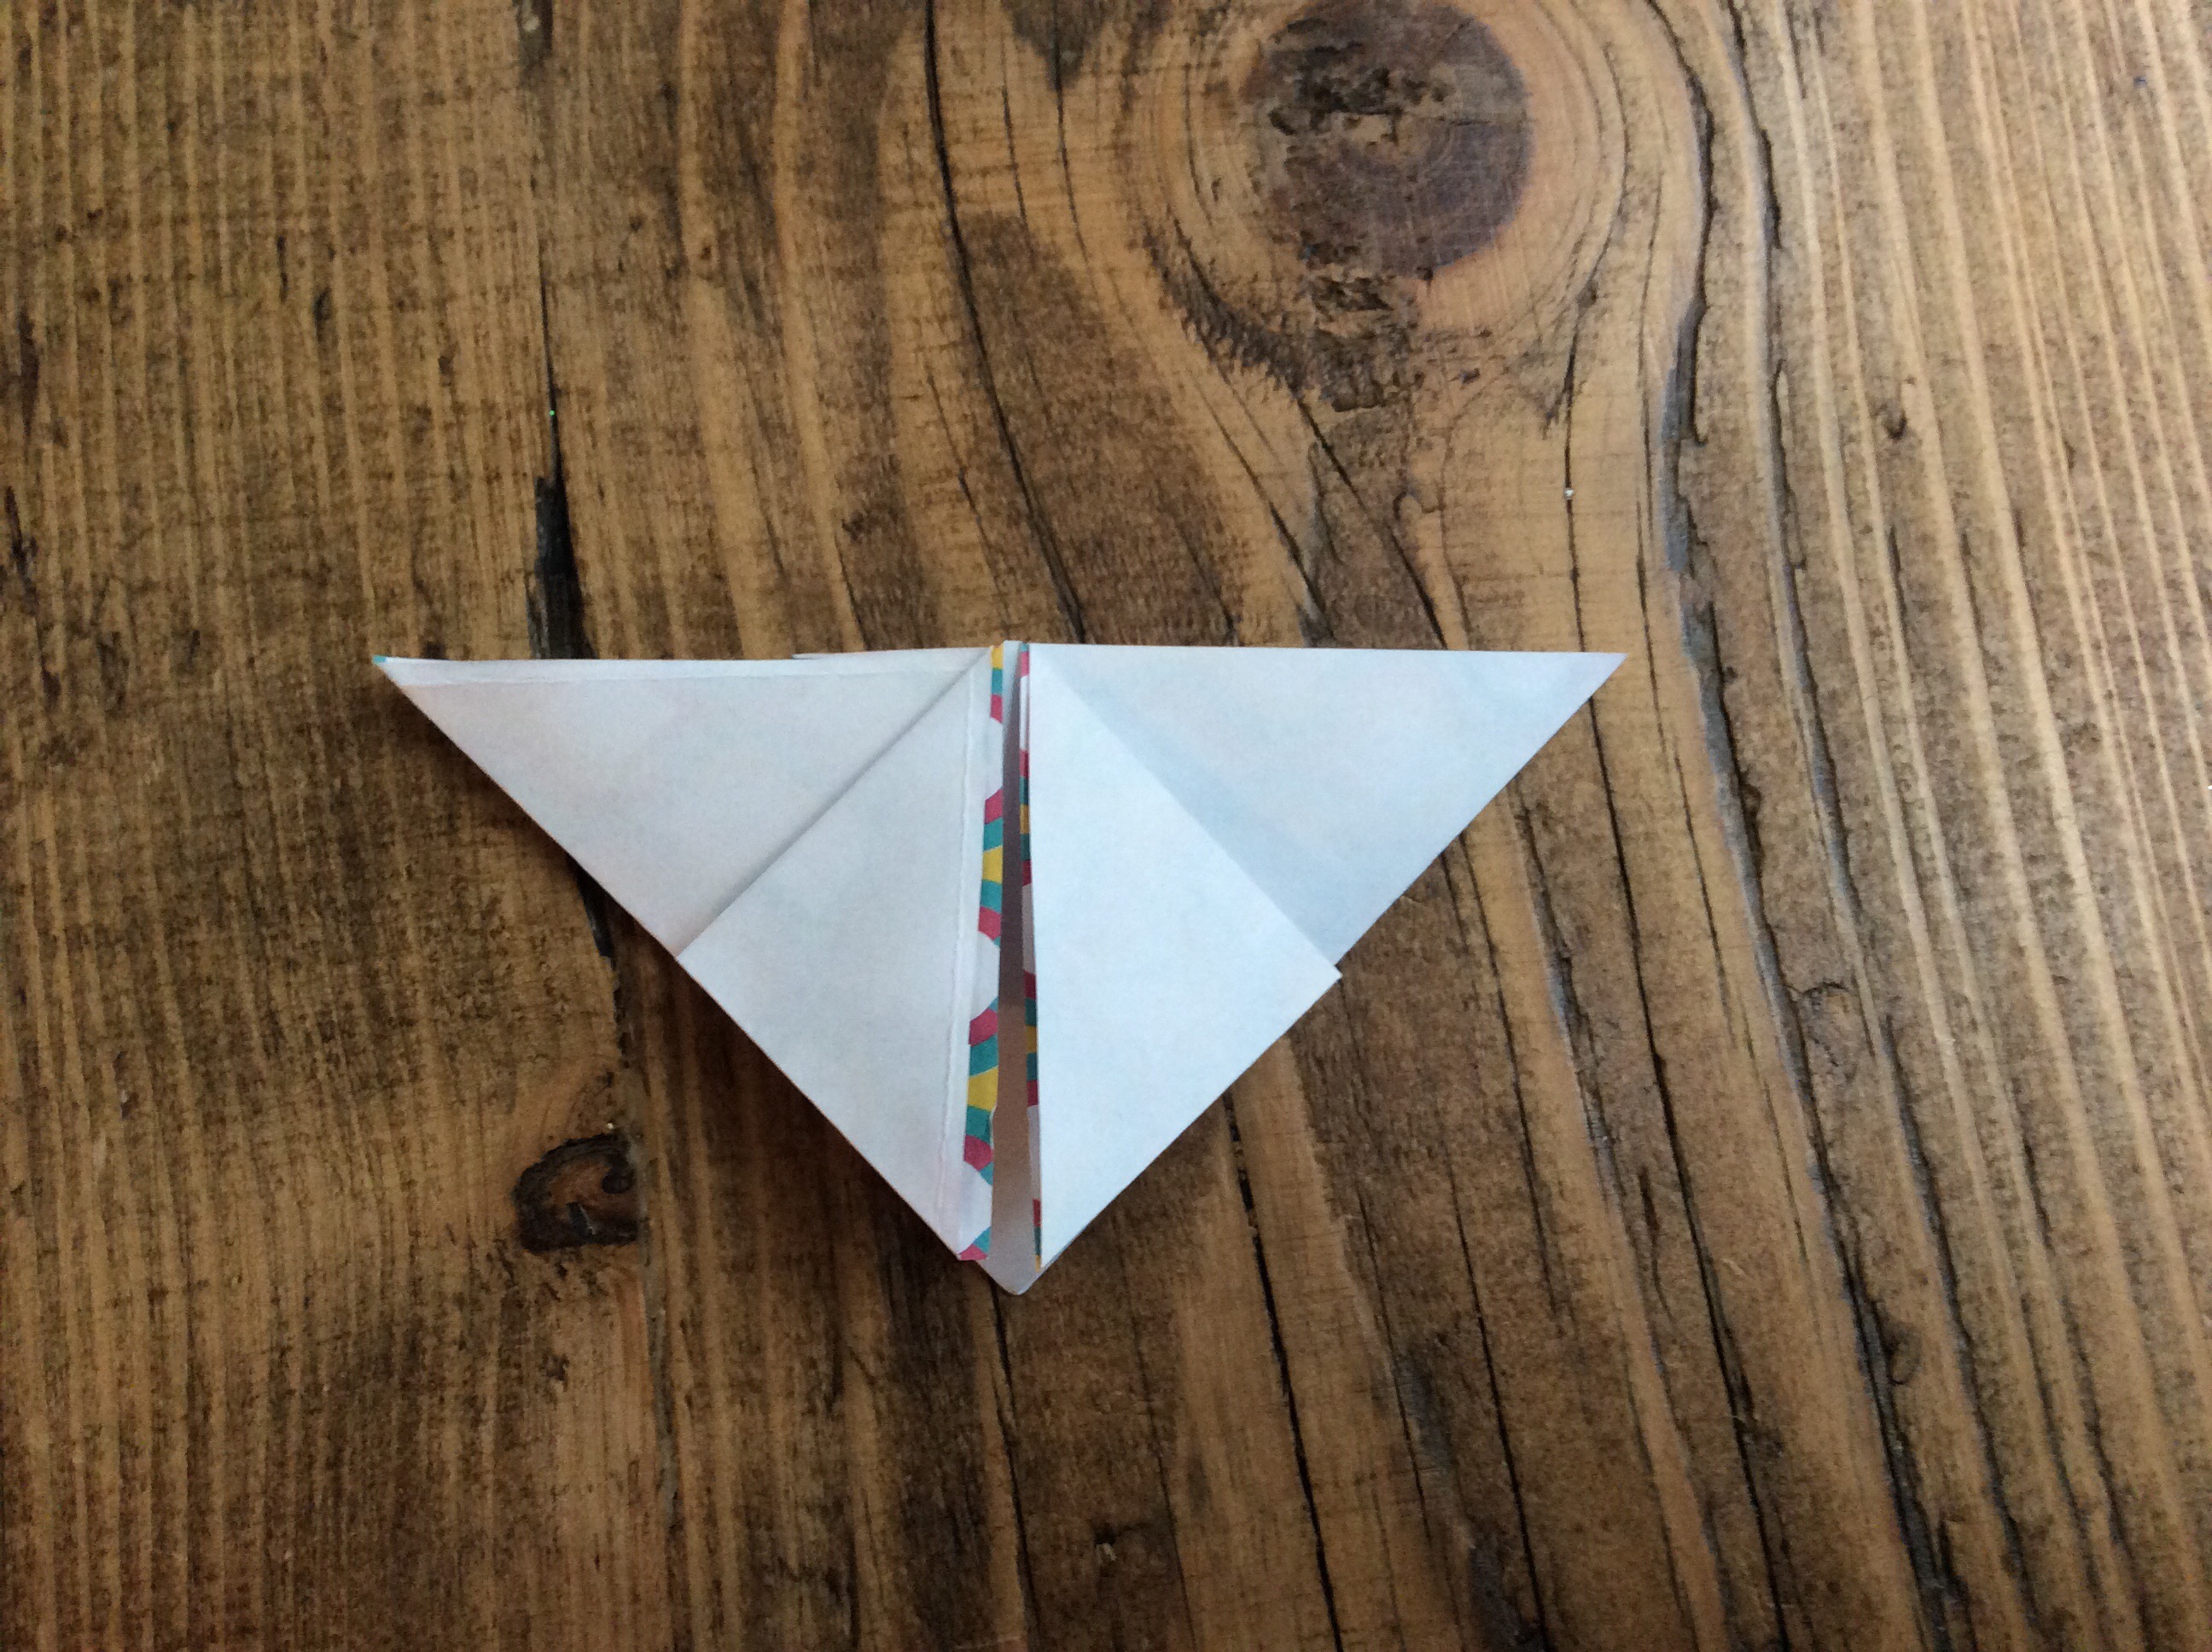
5. Fold the corners of the triangle down to the middle points on each side.

6. Fold the side points into the centre, repeat this for all 4 points.

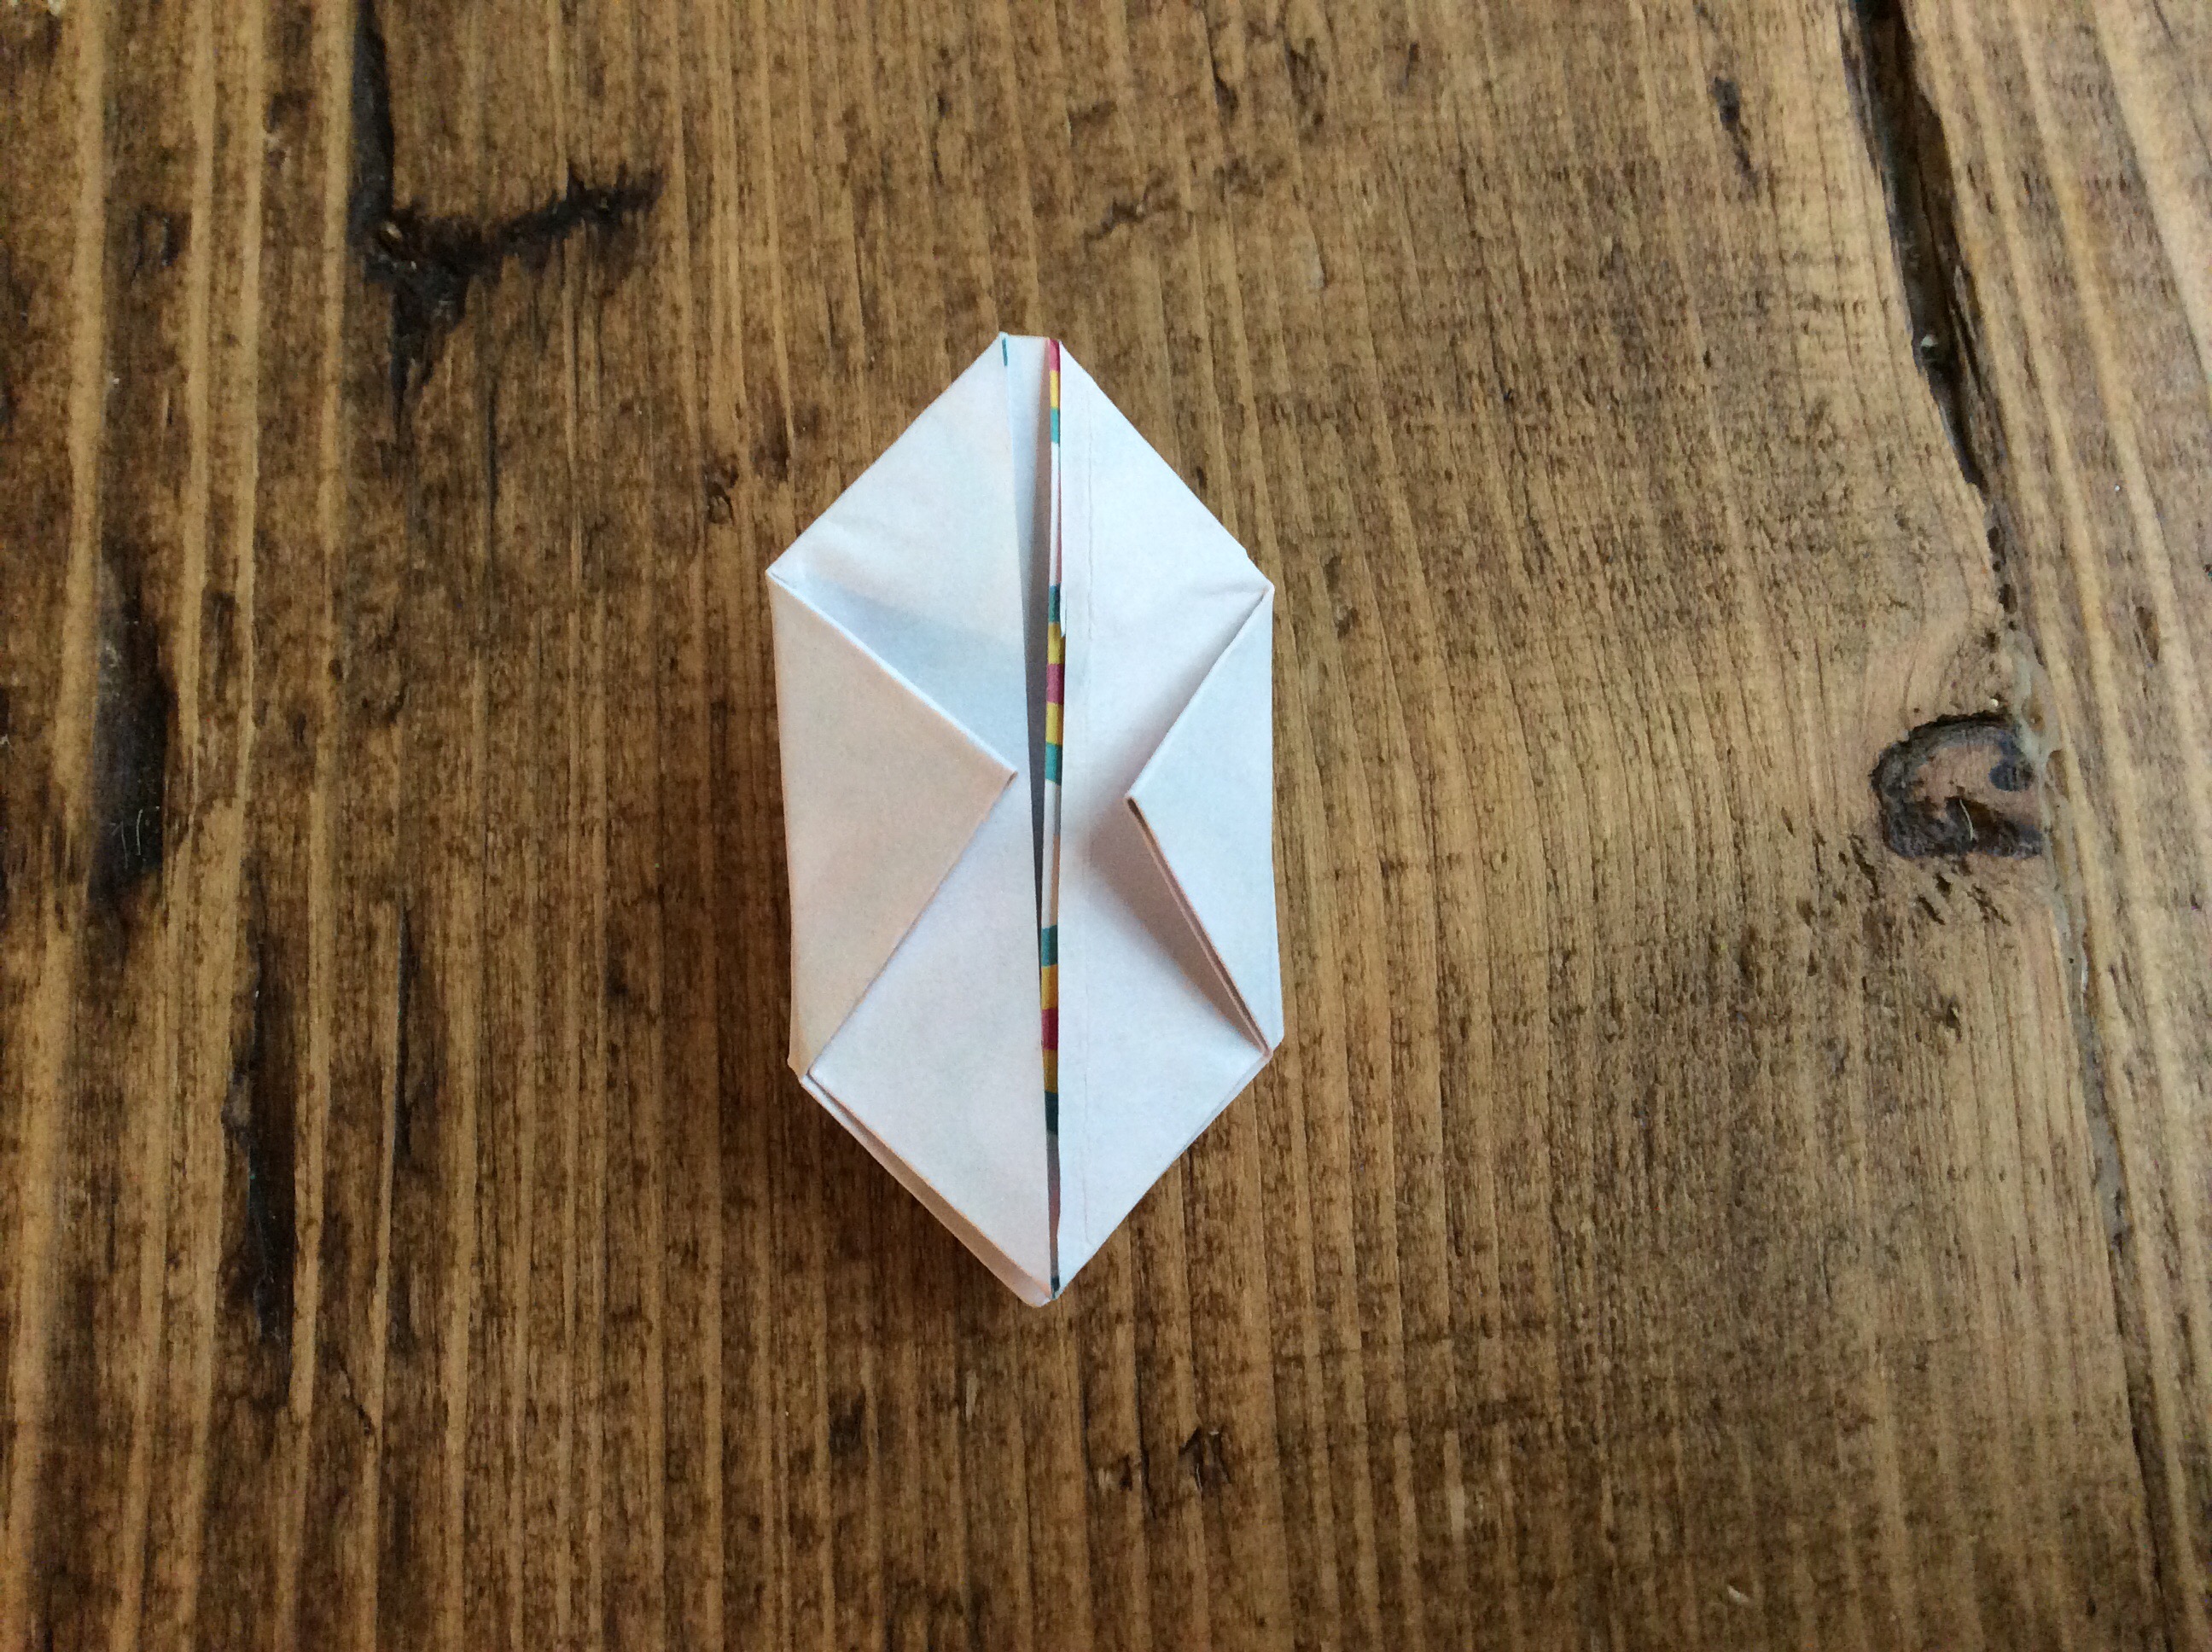
7. Tuck the 4 spikey points into the folds created in the previous step. 

8. Fold the two end points into the centre and back again to create a fold line.

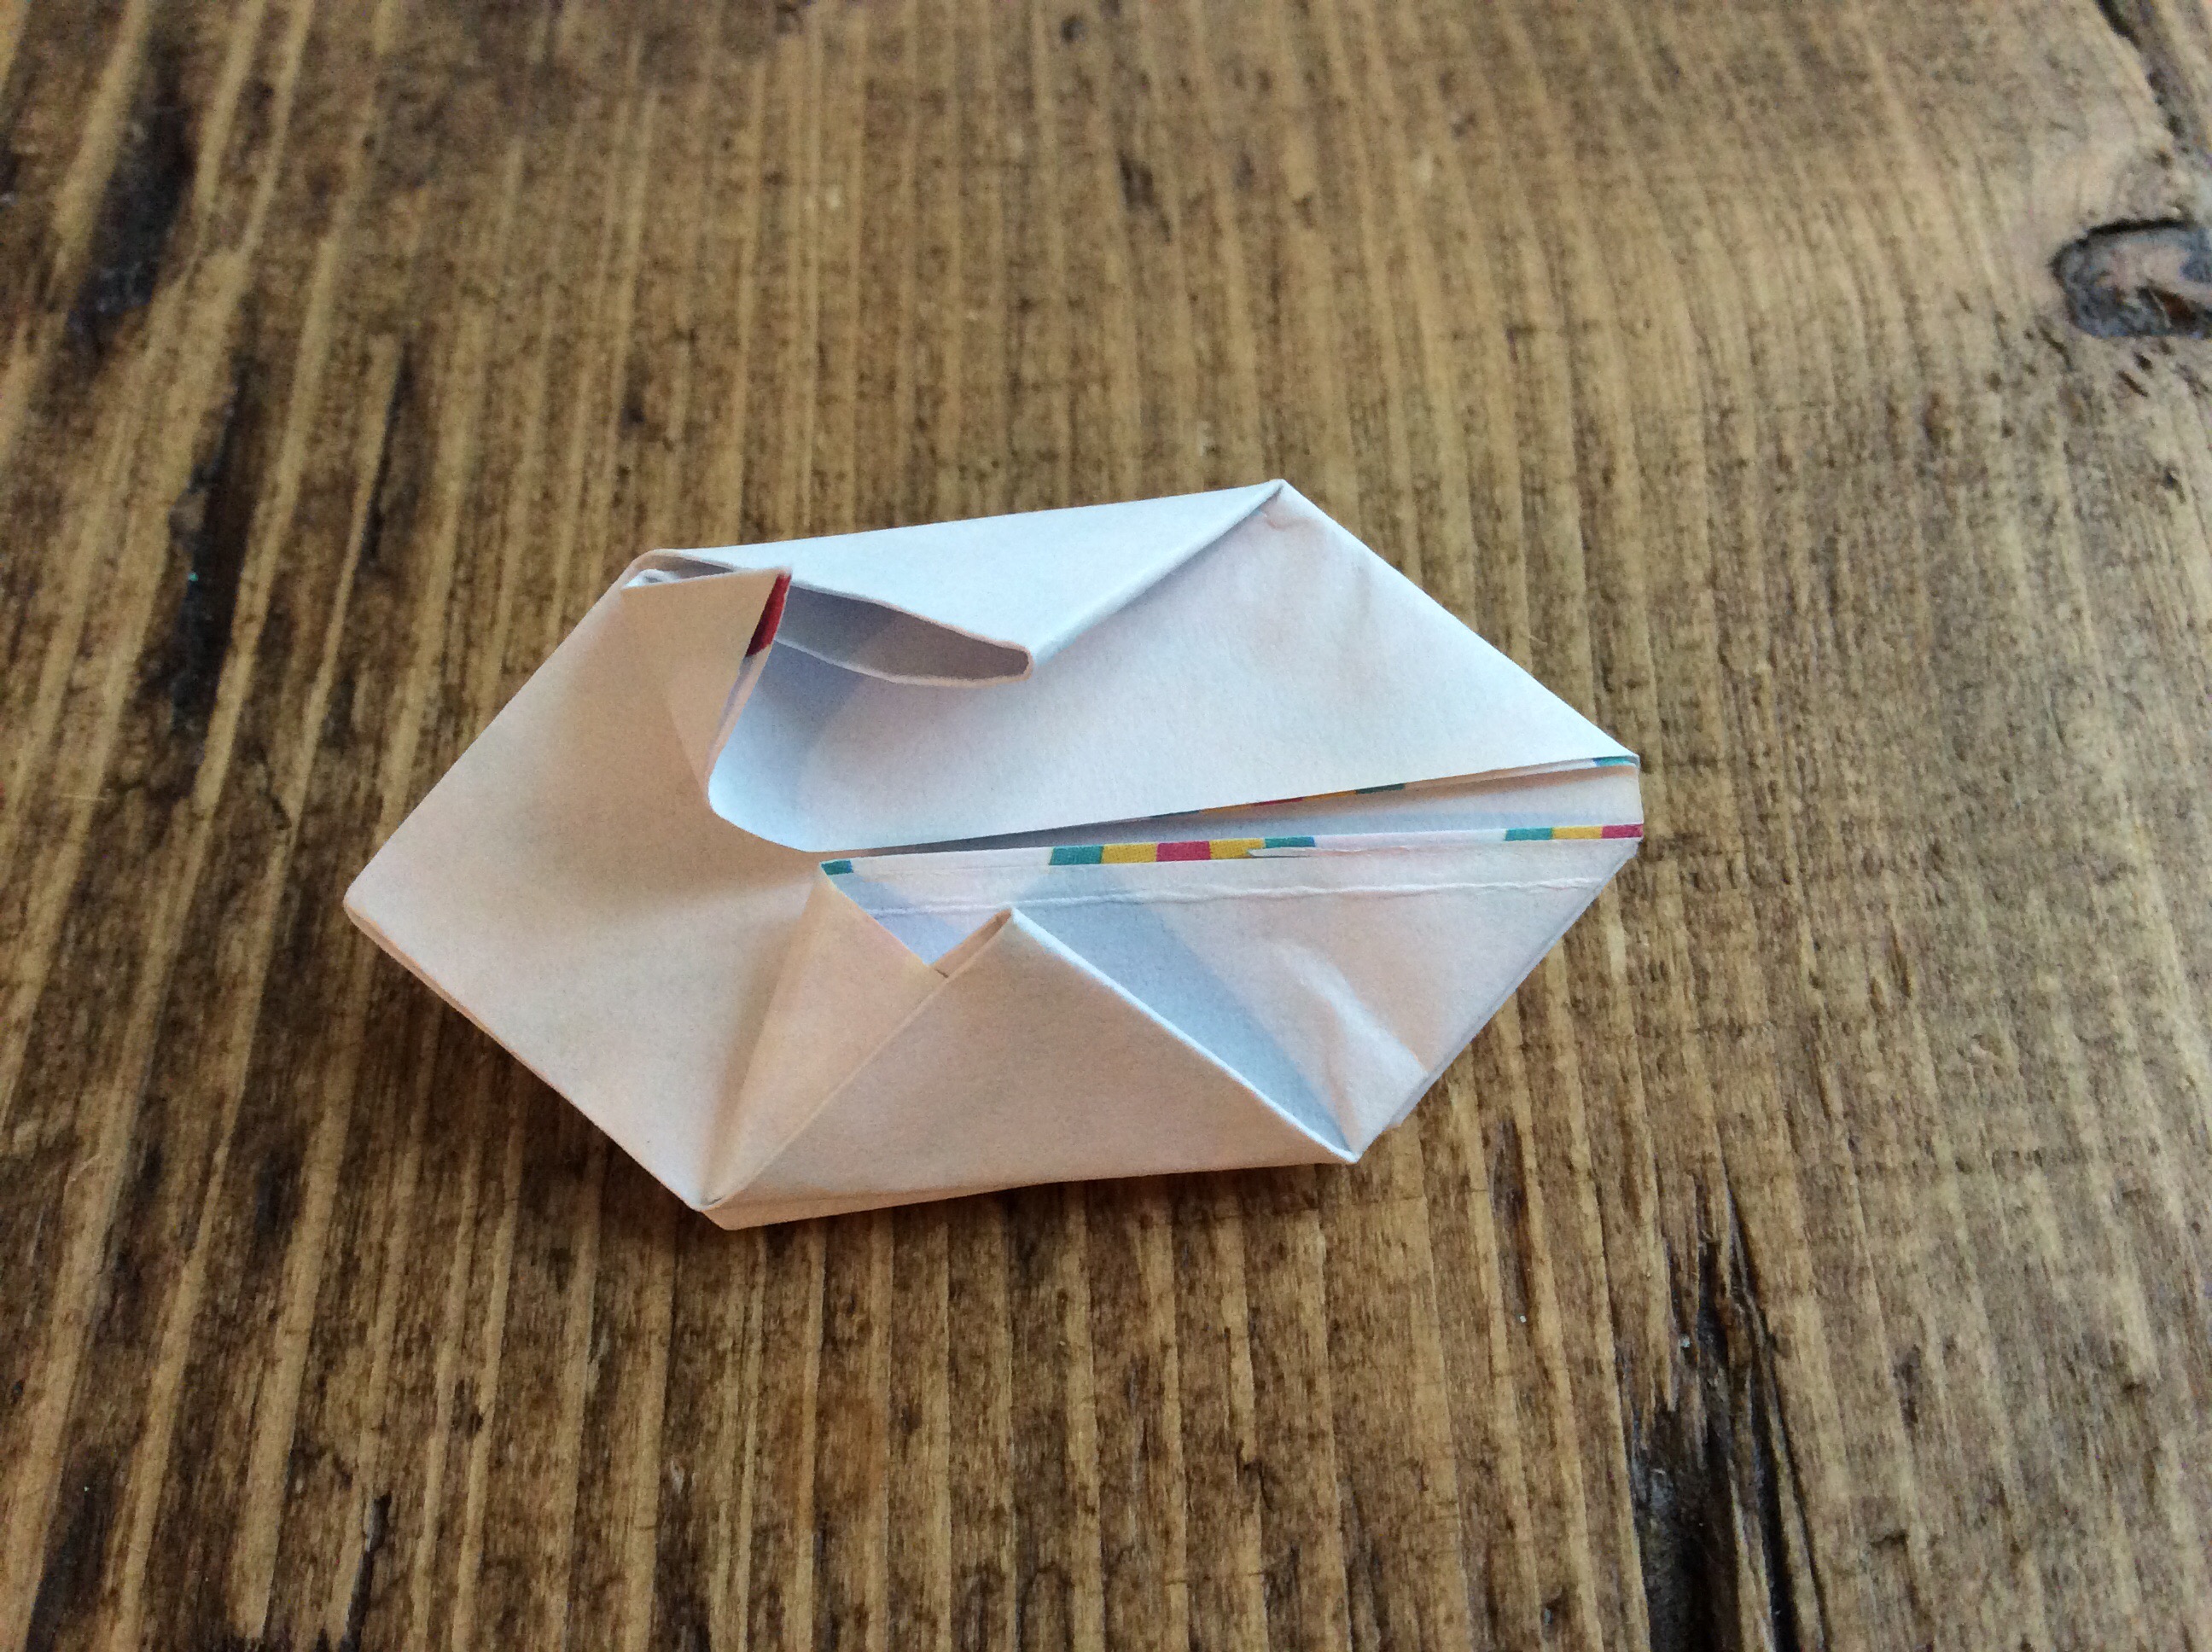
9. Poke your index fingers in between the little wing pockets and pull apart gently so that the lantern takes shape.

10. Place the fairy light through the gap in the lantern and hey presto!

If you’re looking for more DIY Christmas decorations to make, take a look at Picker’s Kits DIY Christmas decoration kit.

Felt ball Xmas decoration DIY kit

IMG_0405

How does Christmas come around so quickly every year? Yet again I’m feeling unprepared… must start thinking about which presents to buy for everyone soon!

When it comes to Christmas decorations, I like to make them myself. I admit, I have bought a few in the past but I do get lots of joy out of making them. Last year, I invited my friend Katie round and we sat and crocheted some baubles whilst drinking warm spiced apple juice (it was a work night!)

I think I caught the Christmas craft bug last year as I remember crocheting a family of snowman baubles, I’ve even dug out the photo!

2014-12-20 22.00.06

What I want to talk about is a new DIY kit recently added to www.pickerskits.co.uk – the felt ball Christmas tree decoration kit. It consists of eight felt balls, each one a different colour. I really love the style of this decoration, the wool of the felt balls gives you that cosy Winter feel and the bright colours will look fabulous against the green of the Christmas tree.

If you’d like to make your felt ball Christmas decoration, you can find it here on the Picker’s Kits website.

Fabric button rosette DIY brooch


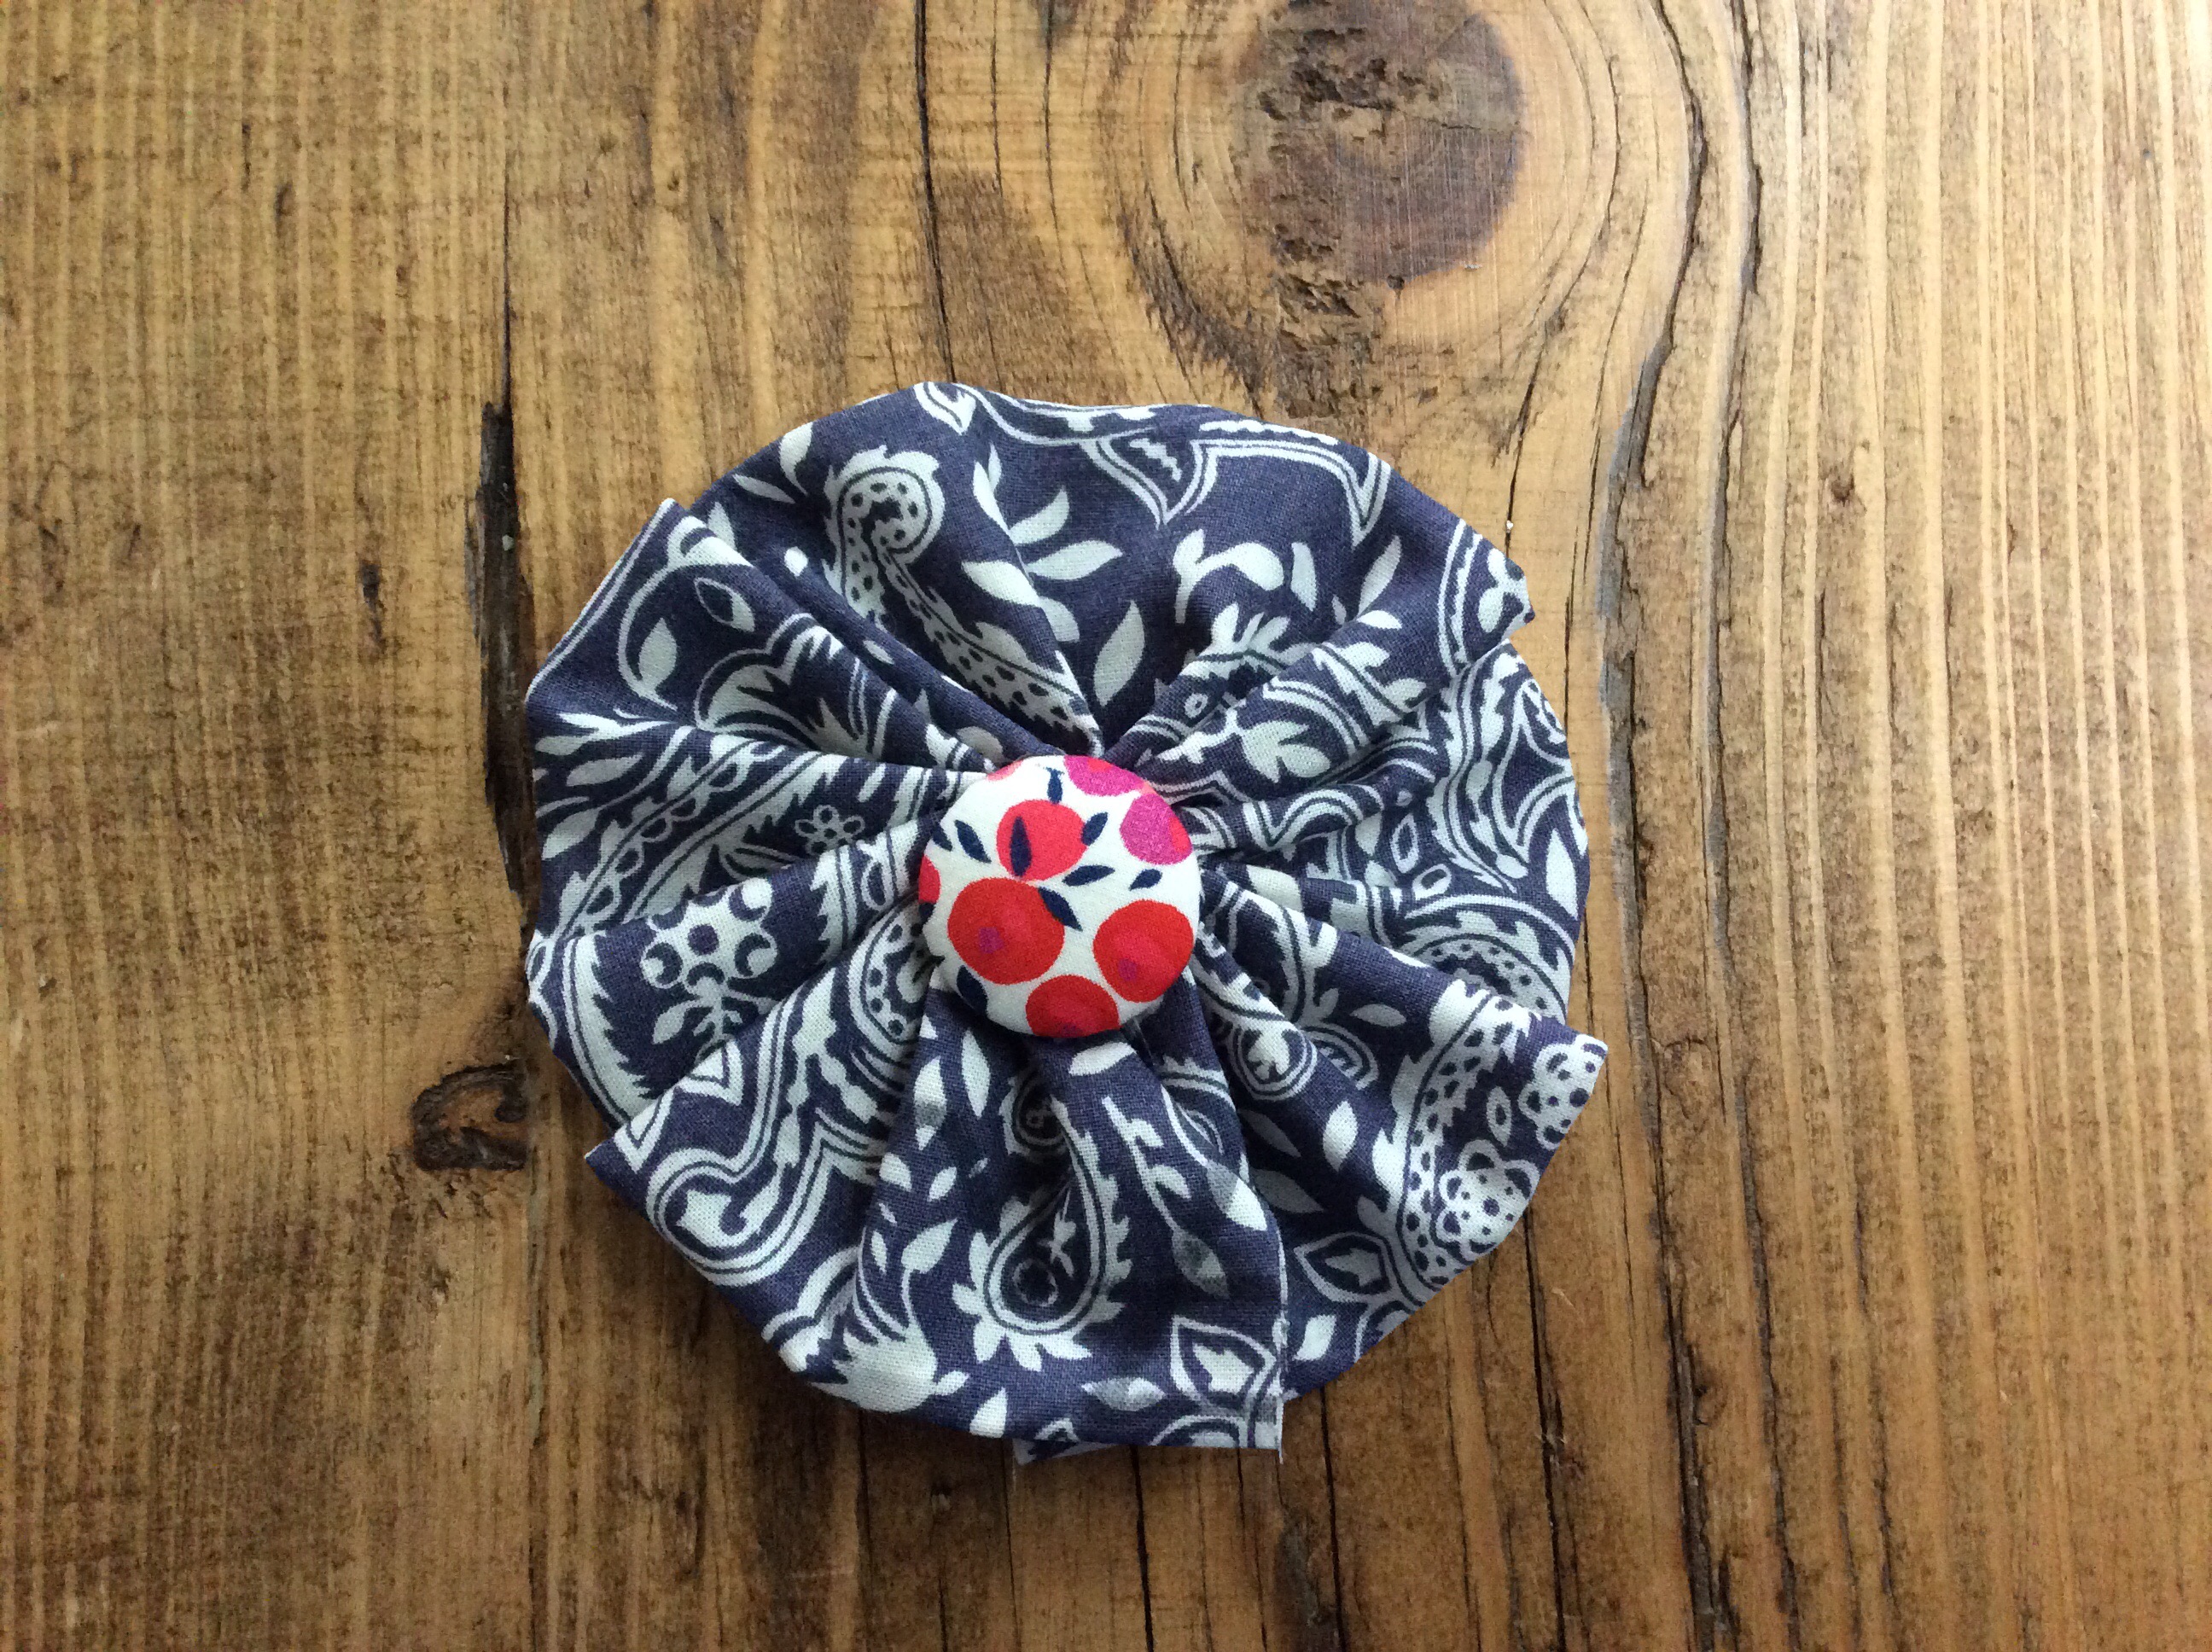
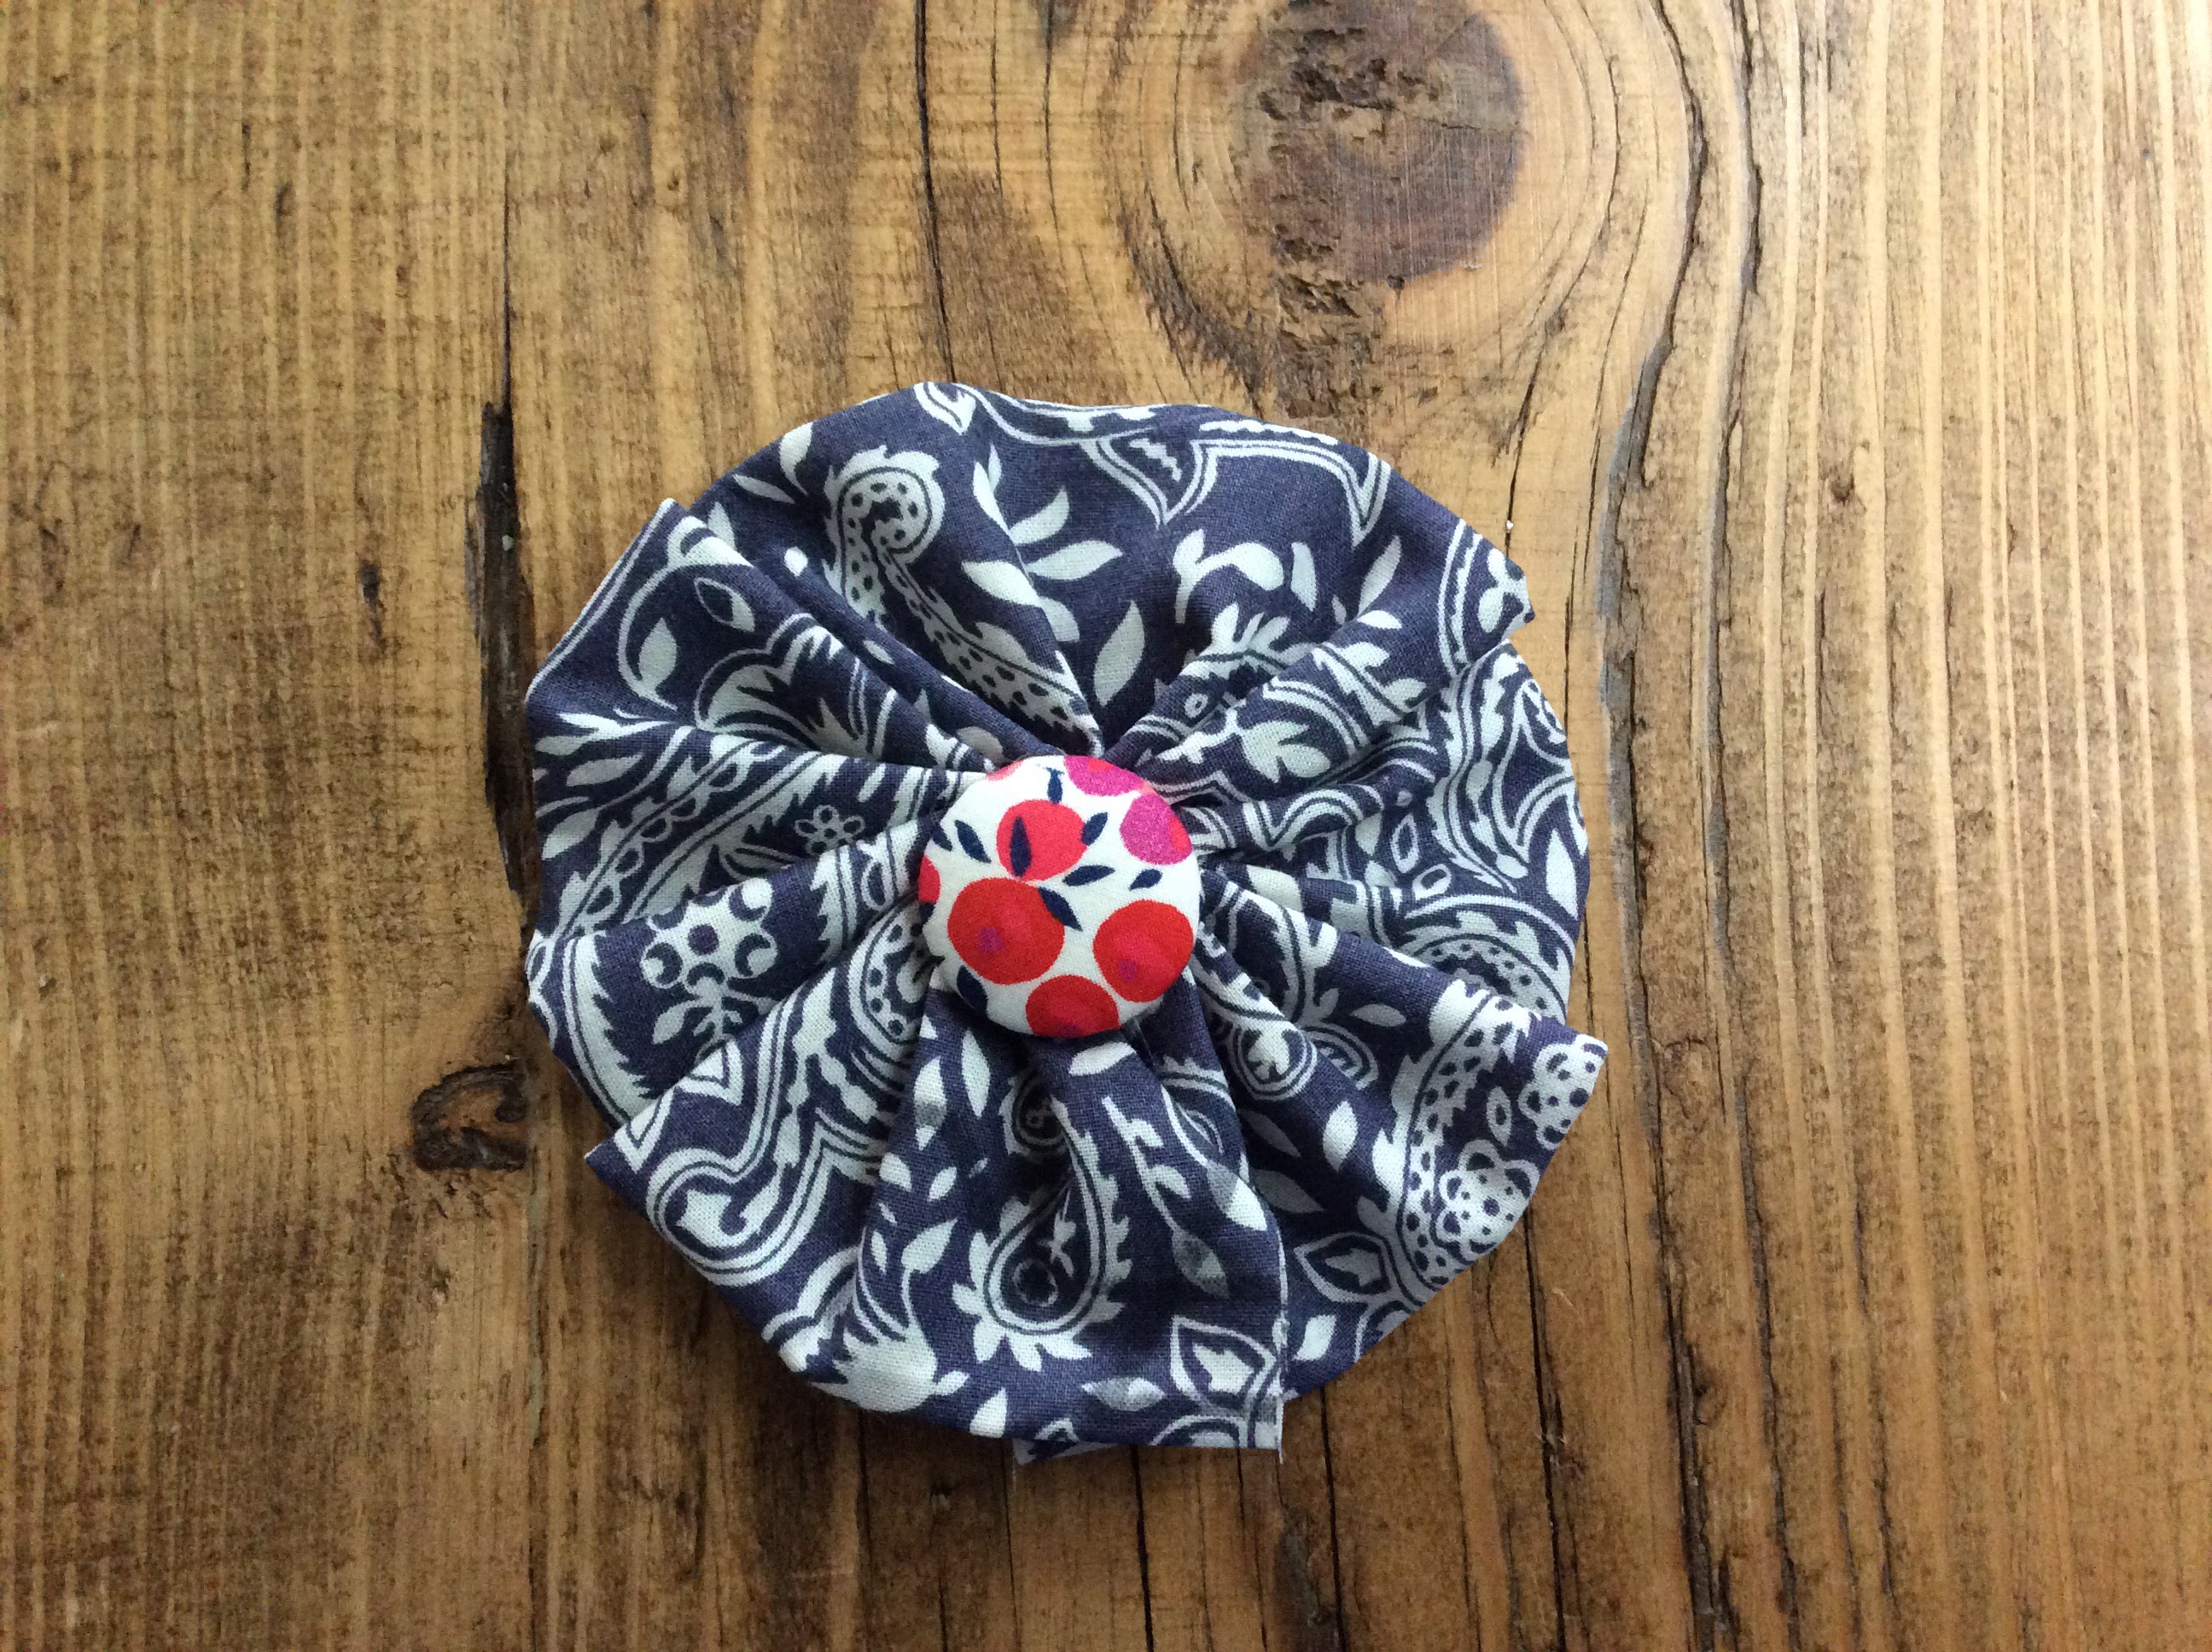
If you’re looking for a brooch to brighten up your coat or jacket, this one’s the answer. It costs pennies, takes just 5 minutes to make and looks neat and pretty too! This would make a lovely gift, or would work as an ideal item to sell on a charity or fundraising stall.

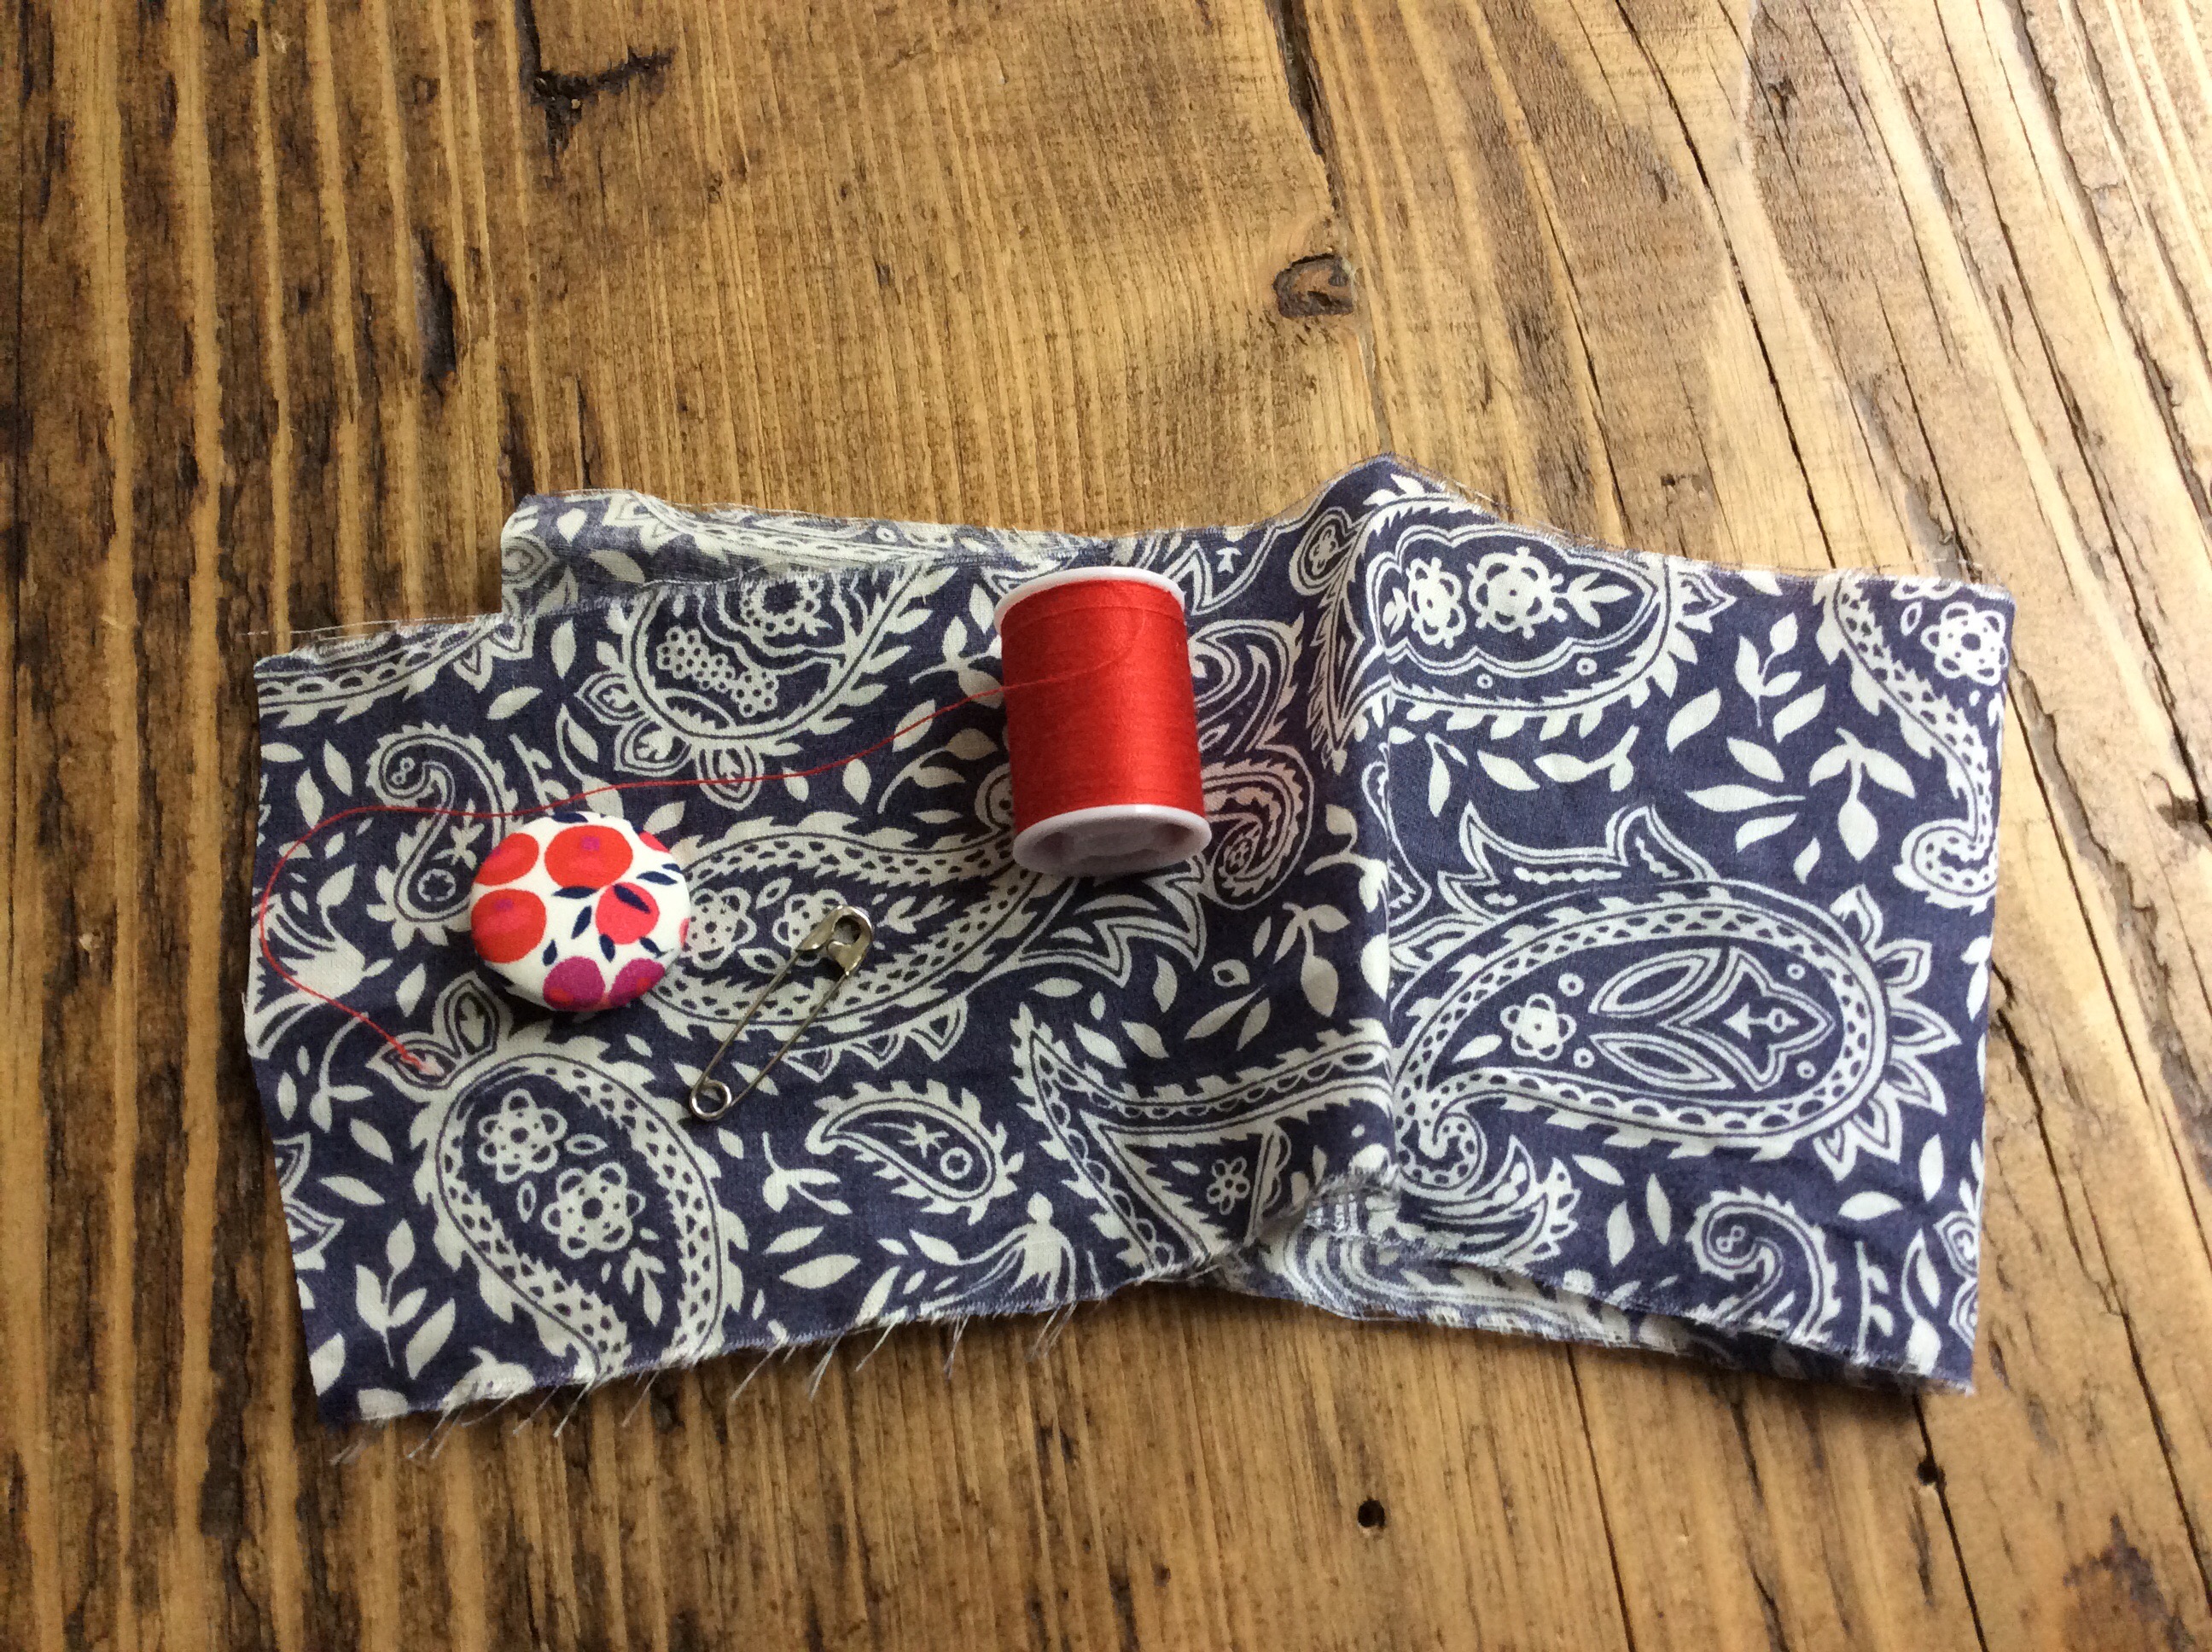
You will need:

– a strip of fabric
– a large button
– safety pin and thread
– fabric scissors

How to make a fabric button DIY brooch:

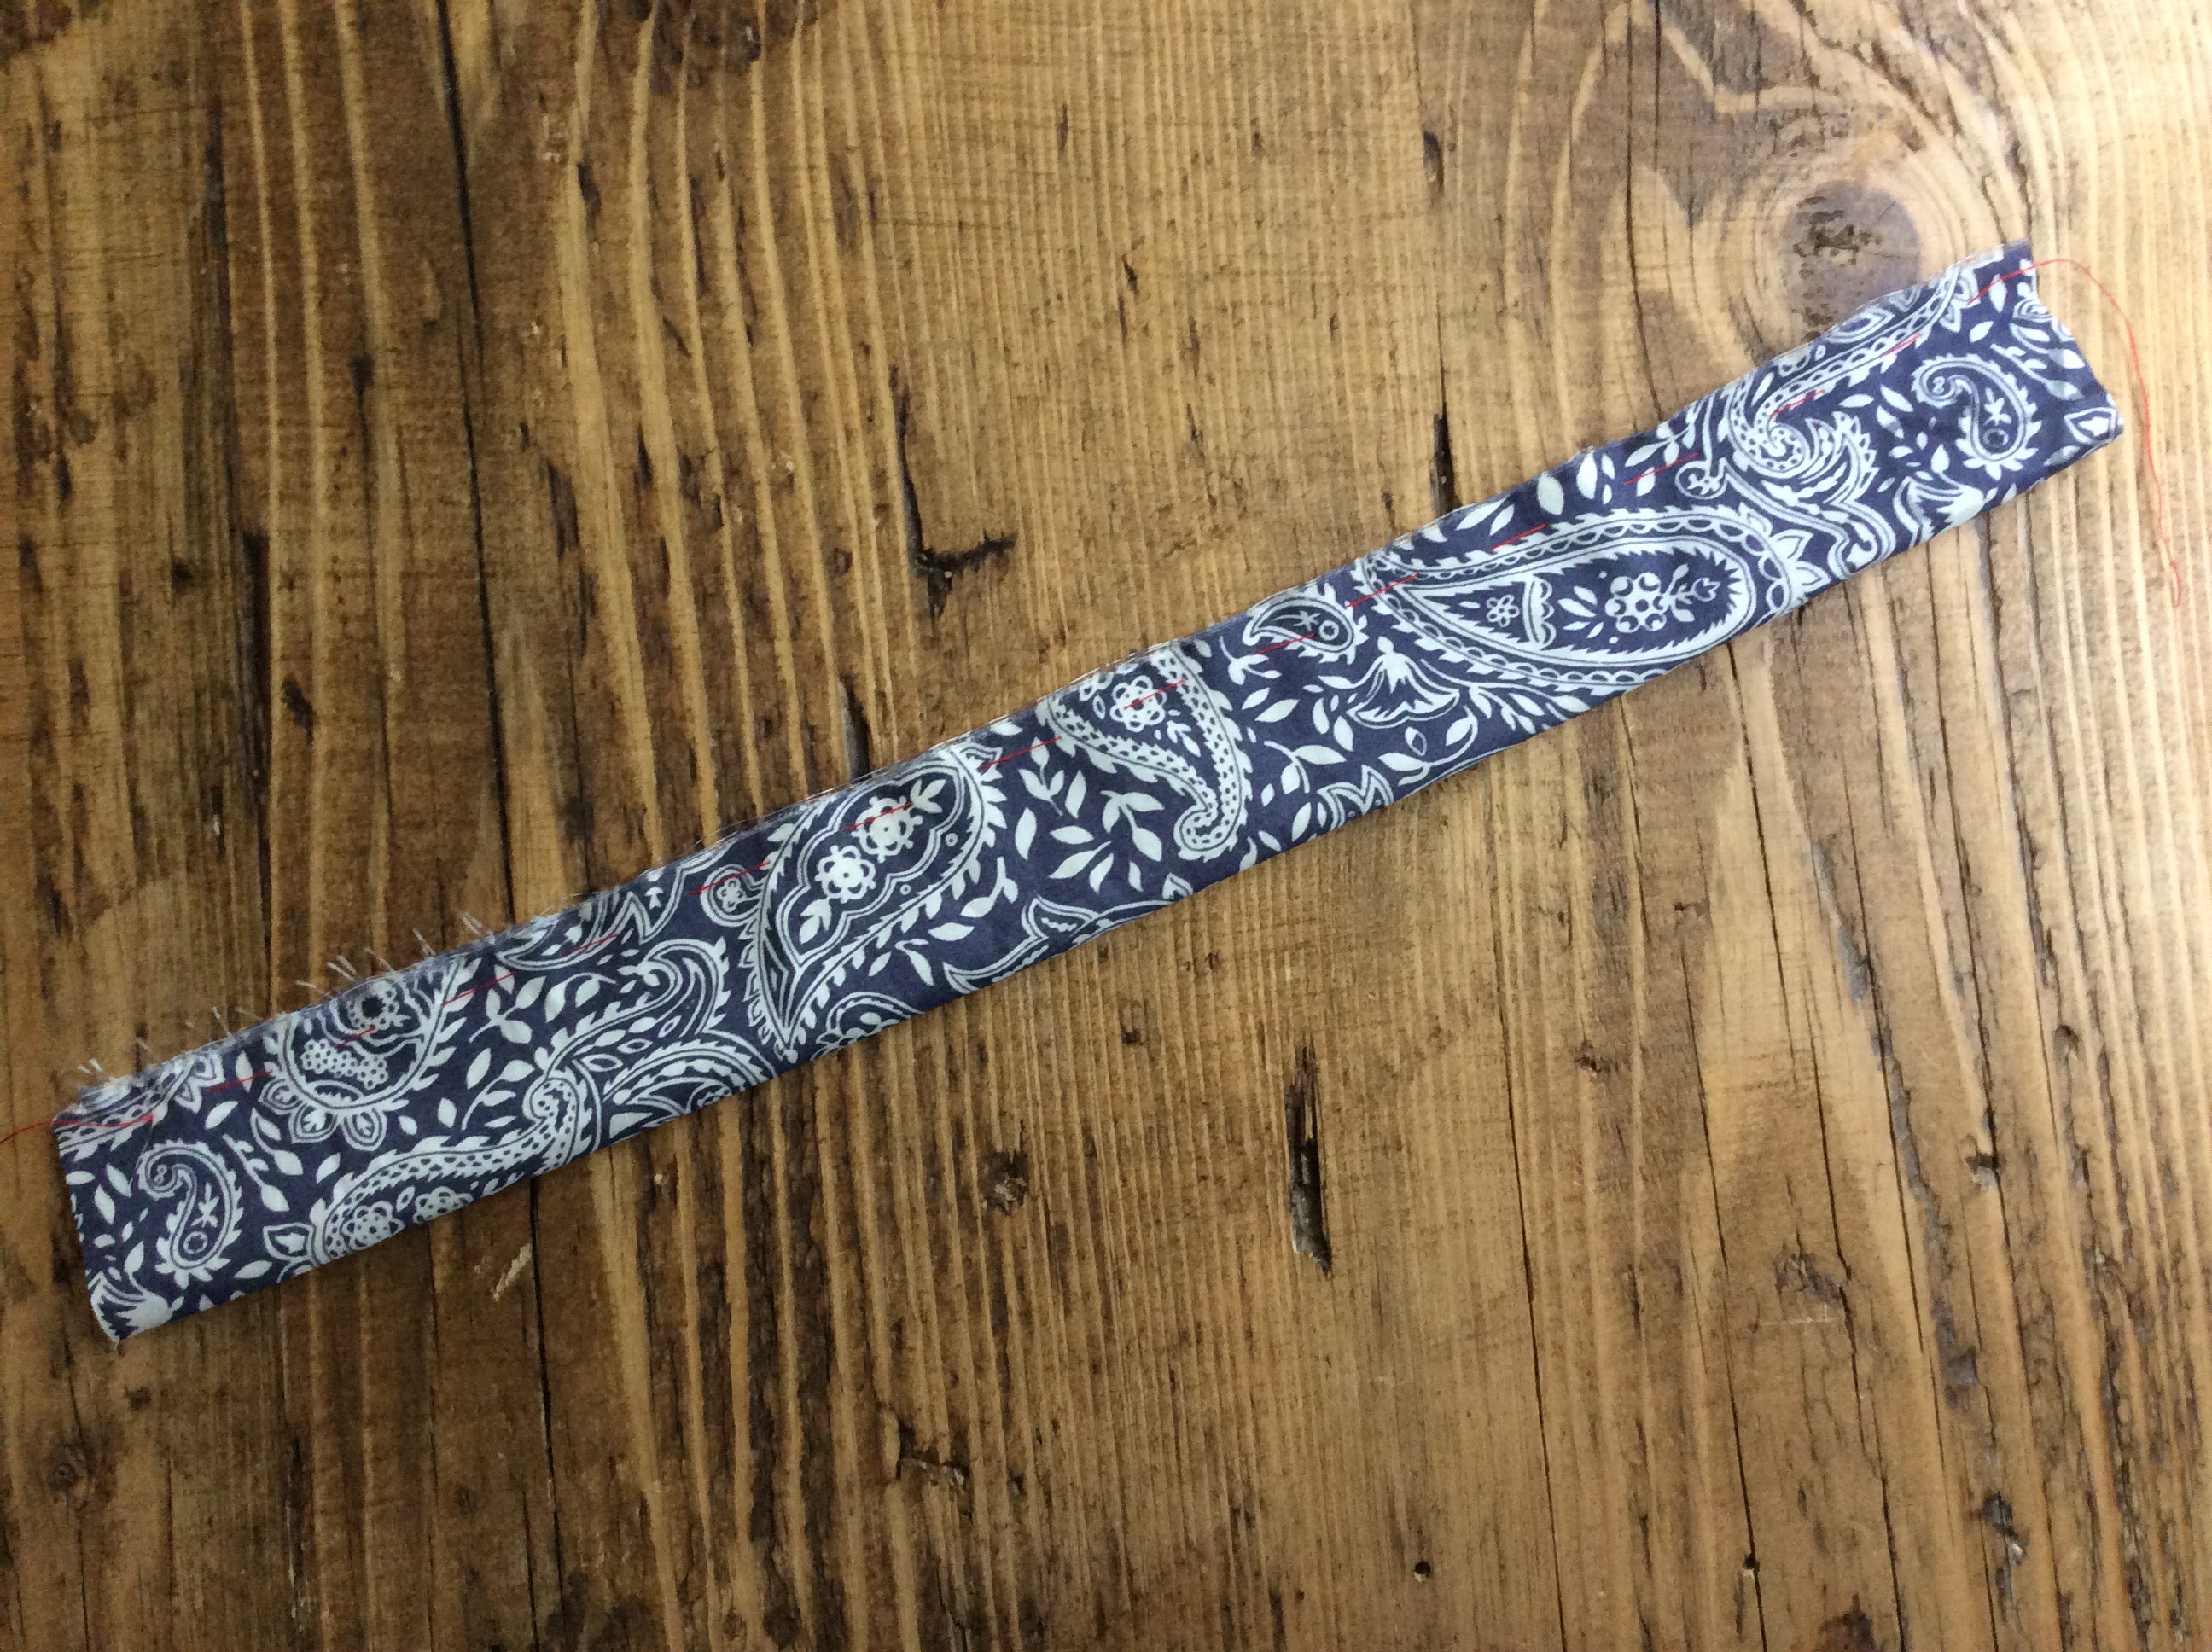
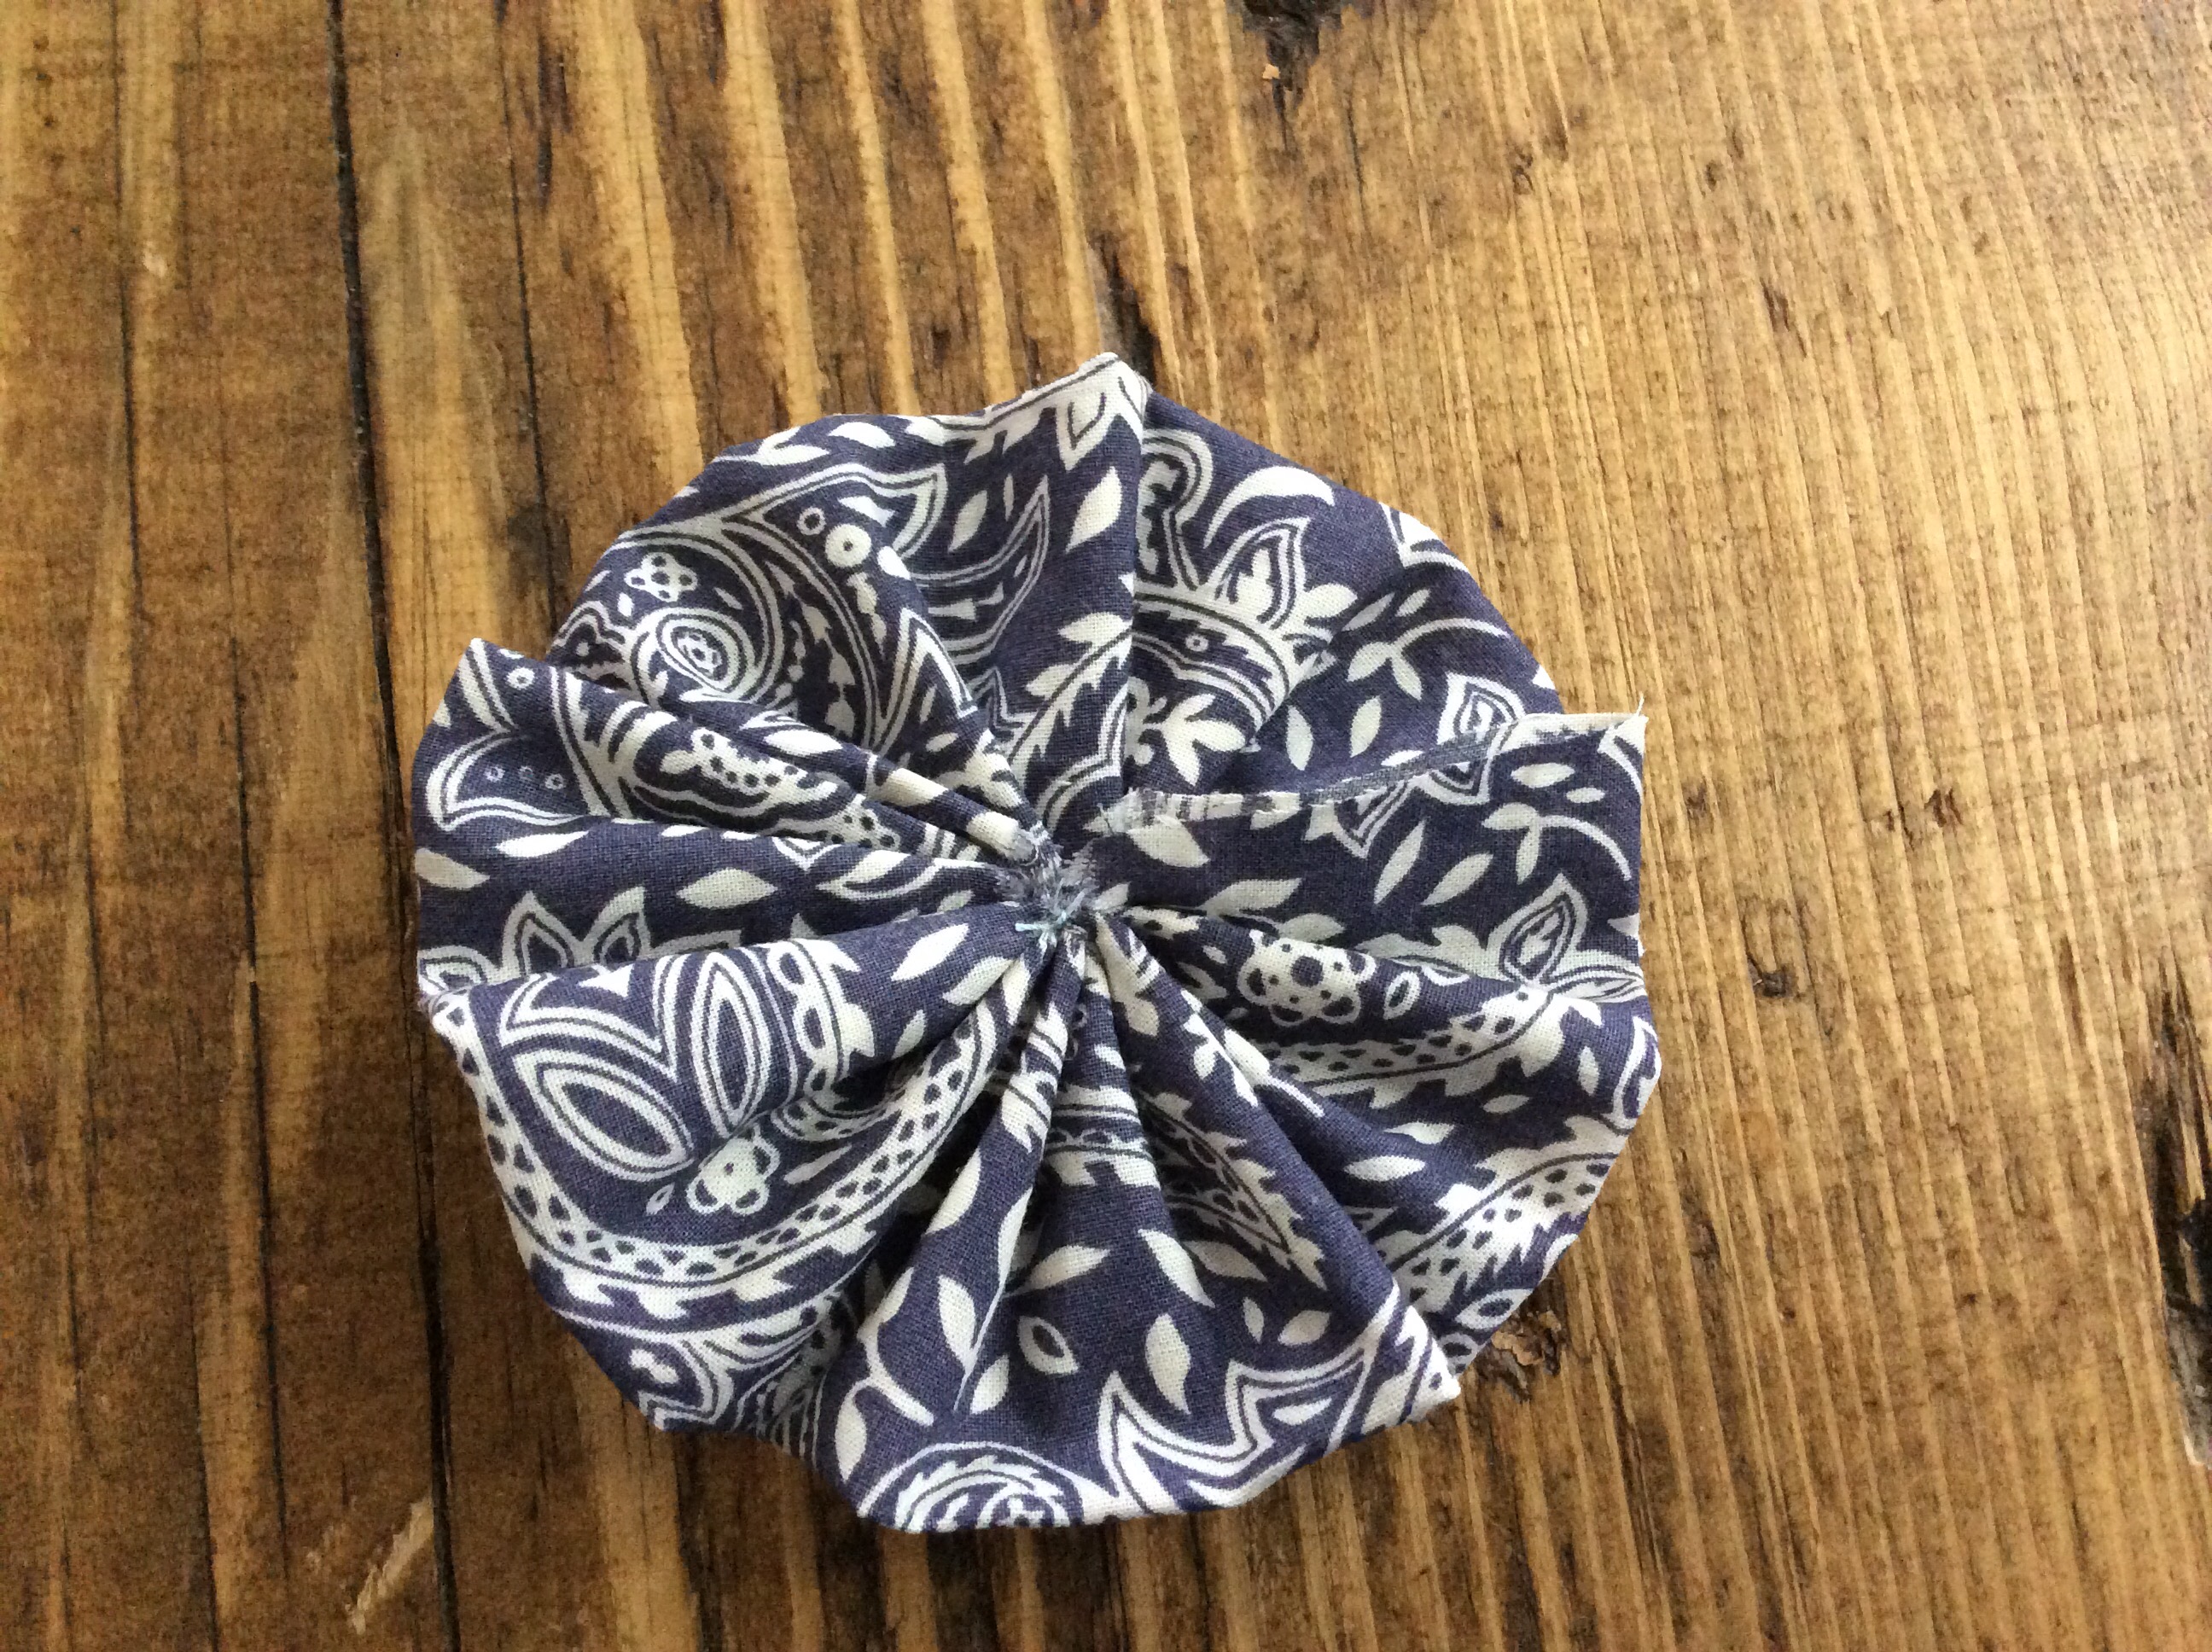
1. Cut fabric into a strip, the one shown in the photo is 35cm long x 8cm wide. Fold it in half length-ways, wrong sides together. Do a running stitch along the raw edge with stitches about 1cm apart. A red thread has been used in the tutorial so that it stands out in the photo.

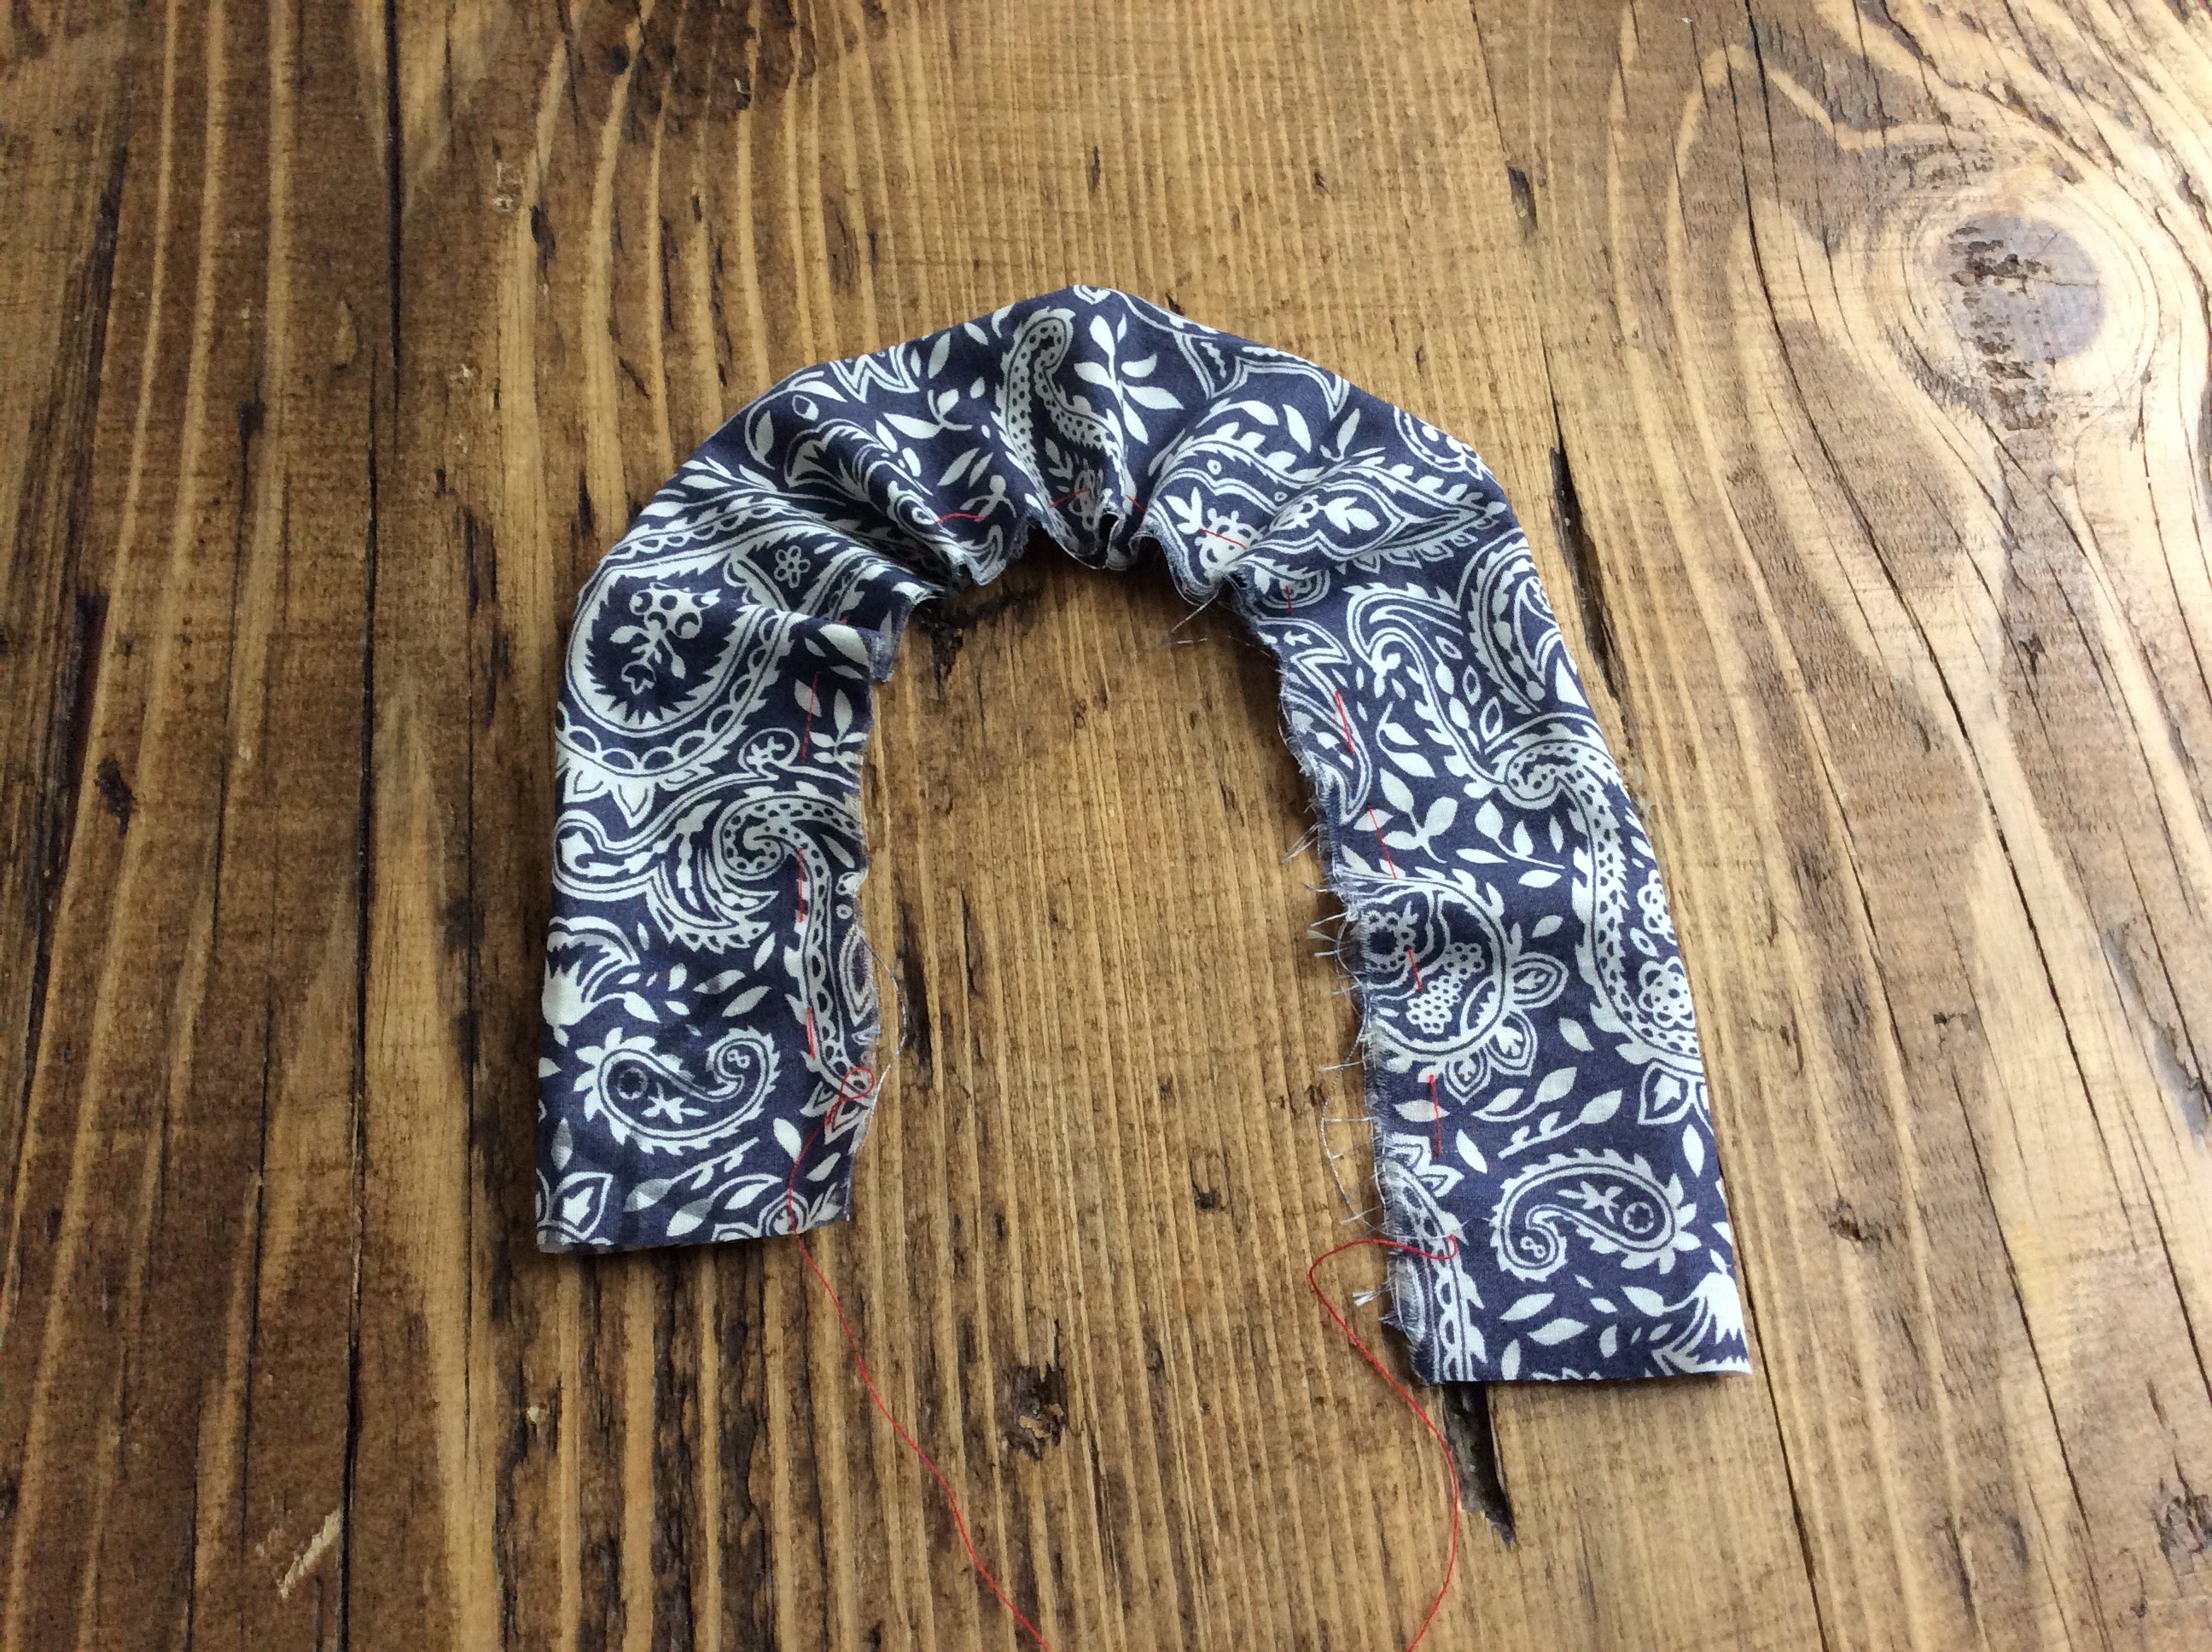
2. Pull the thread at either end so that the fabric crumples up.

3. Tie the two threads together, place a button in the middle, flip it over and sew it in place.

4. Sew a safety pin on that side if you’d like to make it into a brooch, and there you are!


A brooch in 5 minutes! If you’d fancy a button like the one used in the photos, check out the Liberty buttons kit on Picker’s Kits.

Infinity scarf DIY kit

With the weather getting colder, what is a better way to keep that chill away than a cosy, jersey infinity scarf?

This DIY craft kit is one of the latest additions to the Picker’s Kits collection. To make this accessory, you’ll need a sewing machine and about an hour of time. It’s the ideal project for a beginner as it involves lots of sewing in straight lines!
The scarf pictured incorporates hot, vibrant colours to compliment the muted tones of the Autumn and Winter season.

I’m a fan of the infinity scarf, and scarves in general really. You can never have enough colours or styles; at the last count, I think I had about 18. I like to wear a scarf with dark clothes, especially at work as it can brighten anything up plus adds a cosiness around your neck (and no worries of accidentally showing cleavage)!

Check out the infinity scarf with its fabulous zig zag multi-coloured fabric print. It’s the first infinity scarf to be added and I’m hoping to add more to the website very soon!


This kit would make an ideal gift for a crafty person you know (my mum has already earmarked one for a Christmas present!); or you can make it yourself then decide whether to give it away or keep it for yourself 🙂

Check out the scarf kit on Picker’s Kits

Button bouquet DIY kit

   
Something old, something new, something borrowed, something blue… something handmade? Over the past few years, it’s become increasingly popular to have a ‘different ‘ bouquet. Flowers are beautiful but they don’t last – a button bouquet is something you can keep. You’ve heard of dresses and veils being handed down as a family heirloom, so why not a bouquet? New to Picker’s Kits is this button bouquet DIY kit for quirky brides everywhere. You can buy a ready-made button bouquet for in excess of ÂŁ200 but if you’re willing to put aside some time, you can make your own for just a fraction of the price. 

This DIY button bouquet kit provides the buttons, ready-cut wire and ribbons you need to make this beautiful bridal accessory. There are even several colour options to choose from so you can be sure that your bouquet will match the theme. 

Making this bouquet is easy, no craft experience required, you can even sit and make it whilst watching the latest box set. It’s a very rewarding task; seeing the bouquet grow and of course getting such a delightful product at the end.

If making the bouquet by yourself is a bit too lonesome for you, this is the ultimate hen party activity, get it done in a fifth of the time and you can walk down the aisle knowing that your lovely friends each contributed to the beautiful bouquet you’re holding!

Button bouquet DIY kit on Picker’s Kits

Easy DIY craft makes

I’ve been gleaning the best of the web for a few ‘easy makes’… things that you can make on a rainy Autumn Sunday when you have a couple of hours to spare. They’re not particularly expensive either, you can use fabric scraps and things lying around the kitchen 🙂

You can even find a Pinteret board for it, check it out here. Please do follow the Picker’s Kits Pinterest account and I’ll be sure to follow your account back!

Here goes…

1. Fabric key ring

These key rings can be made from left-over scraps of fabric and make great gift!

Key fobs

Key ring instructions from http://www.theidearoom.net/

2. Fabric charm bracelet

This is another item that can be made from left-over fabric. This tutorial comes from @quintonwench and her awesome blog. Well worth a look for crafty ideas!

bracelet

Charm bracelet instructions from http://www.leasowesview.com/

3. Homemade heat packs

These heat packs are the ideal Winter treat… stick one in the microwave, curl up on the sofa and relax feeling warm and toasty!

Homemade_Heat_Packs_Tutorial

Heat pack instructions from http://www.pluckys-secondthought.com/

4. Cover your own washi tape

Washi tape is a popular thing at the moment but it’s known to be expensive, here’s a wonderful tutorial about how to make your own washi tape at a fraction of the cost.

washi_tape2

Washi tape instructions from http://fiksd.blogspot.co.uk/

5. Salt and cinnamon dough ornaments

With salt dough you can make Christmas decorations, wedding favours, gift tags, key rings, not to mention a whole host of other things. This fabulous blog post gives you all of the ingredients you need to make them, plus, if you’d like an edible decoration, you can make some cinnamon ornaments… yummy!

Salt and cinnamon dought ornaments2

Salt and cinnamon dough instructions from http://www.irocksowhat.com/

Start the week as you mean to go on

Start the week

What a treat, I have a whole week off this week before I start my new job. There will be no sitting on the sofa in a onesie watching films and scoffing biscuits for me. I’ve got my ‘action plan’ for Picker’s Kits – doing things I’ve been meaning to do but just haven’t had time for.

This includes taking a proper look at Pinterest (have you seen the Picker’s Kits boards?), devoting dome time to Twitter, writing a schedule for blog articles and doing a little product development for Christmas kits. I’ve got 6Music on in the background and can’t remember how many cups of tea I’ve had already.

The intention was to begin the day all virtuous with a run around the block but I woke up to see rain and generally rotten weather so that scuppered my plans…maybe tomorrow!